Integration with Azure AD
SSO with Azure AD
With Cyral, you can authenticate database users against your Azure Active Directory (Azure AD) identity provider, and Cyral can read each user's group memberships from Azure AD to determine the user's privileges. This integration uses Azure AD as a SAML identity provider.
Follow these steps to use your Azure AD to authenticate database users and Cyral administrators.
info
If you're using on-premises Active Directory, see the section, SSO with ADFS.
In Cyral management console, create a SAML integration
Create a new SAML integration: Log in to your Cyral control plane UI, navigate to the Integrations section, find the SAML integration tile, and click Configure.
Create a new SAML connection:
Specify a Display Name. This display name is used to identify the IdP to the user when they log in.
In Attribute Names in SAML Assertion section, accept the default name for each required SAML attribute (first and last name, email, SSO groups).
Enable IdP-initiated login checkbox: When you add any IdP integration in Cyral, your users can log in using the Cyral Access Portal. If selected, this checkbox gives your users a second way to log in: from your IdP portal.
Set IdP-initiated login to
ONto give users the added option of logging in from your IdP-based portal (for example, an Okta portal).tip
Enabling IdP-initiated login requires a second ACS URL in your SAML app. For details, see SP-initiated and IdP-initiated login.
Set IdP-initiated login to
OFFto disable IdP-initiated login. Do this if login is not supported by your IdP, or if you don't want to let users log in from your IdP portal.
Click Continue
On the next screen, download the SP metadata file. You'll need this in the next step to set up your IdP. You are free to close the page. Your SAML Integration will save as a draft, and you will be able to return to it at a later time to finish entering the required configuration values.
Create SAML Application in Azure
Go to your Azure AD administration page and log in to your account as an Administrator.
Create a new Enterprise Application.
- Specify that it's a non-gallery application
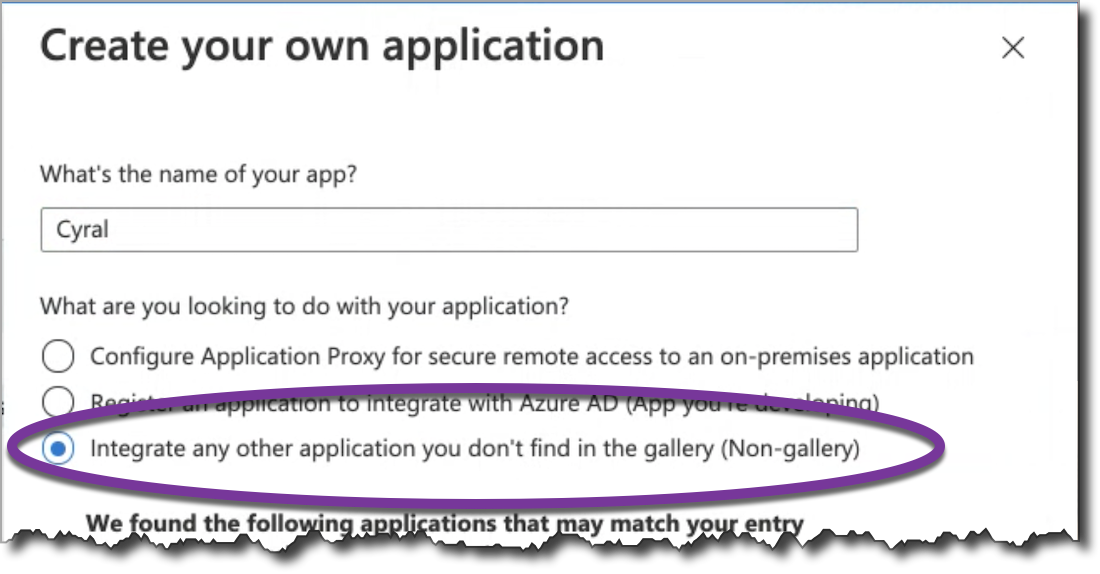
- Specify that it's a non-gallery application
In the application's Single sign-on section, select SAML, and edit the “Basic SAML Configuration. Open the SP Metadata document that was downloaded from the Cyral management console while creating a SAML integration. Copy the following URLs to Azure from the SP Metadata obtained in the previous section:
- Set the Identifier in Azure to the Entity ID from the SP metadata.
The URL should have the following format:
https://$CYRAL_CONTROL_PLANE_DOMAIN/auth/realms/default - Set the Reply URLs in Azure using both of the AssertionConsumerService
URLs found in the SP Metadata. Make sure to add the index of each URL in Azure.
The ACS URL with index 0 should have the following format: The ACS URL with index 1 should have the following format:
https://$CYRAL_CONTROL_PLANE_DOMAIN/auth/realms/default/broker/$IDP_INTEGRATION_ID/endpoint/clients/$IDP_INTEGRATION_ID-clienthttps://$CYRAL_CONTROL_PLANE_DOMAIN/auth/realms/default/broker/$IDP_INTEGRATION_ID/endpoint - Set the ACS URL with index 0 as the default.
Click Save.
- Set the Identifier in Azure to the Entity ID from the SP metadata.
The URL should have the following format:
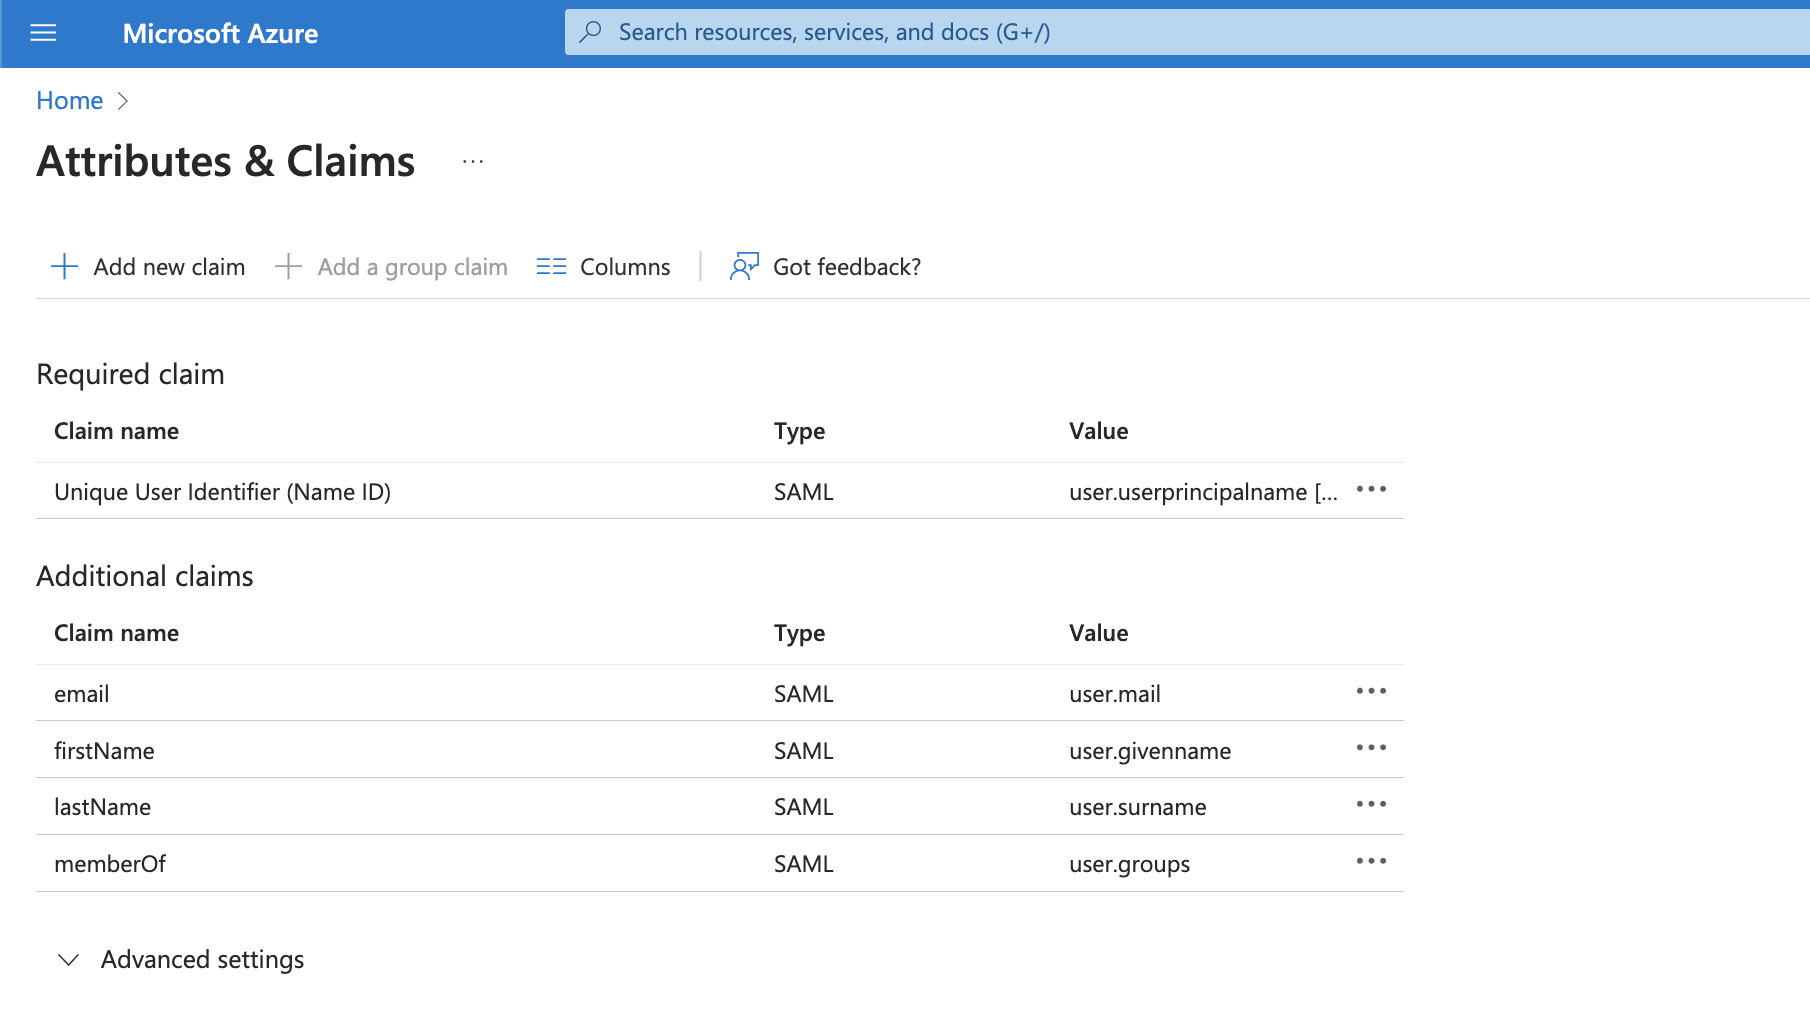
In the User Attributes and Claims section, specify which user data attributes will be sent to Cyral. Add a claim for each of the following attributes:
First Name: This is required. Enter
firstNameas the Name of the claim. Leave the namespace blank. Selectuser.givenNameas the source attribute.Last Name: This is required. Enter
lastNameas the Name of the claim. Leave the namespace blank. Selectuser.surnameas the source attribute.Email: This is required. Enter
emailas the Name of the claim. Leave the namespace blank. Selectuser.mailas the source attribute.
Next, add a Group Claim:
- In the Which groups field, choose select groups that should be granted access to Cyral, or select All Groups.
- Set the Source Attribute to Group ID. If your Azure AD is connected to on-premises Active Directory using AAD Connect Sync 1.2.70.0 or above, you may opt please select sAMAccountName instead.
- Click on Advanced options
- Select the Customize the name of the group claim check box
- Enter the
Nameelement of theRequestedAttribute. The default value ismemberOf. - Click Save.
info
These attributes in Azure side should match with the fields on the SAML integration in the UI.
Under the application's Users and Groups section, assign the users and groups who will be allowed to log into Cyral.
After saving all of the above, go to the Single sign-on section of your app in Azure AD, and find the app's App Federation Metadata Url in the SAML Signing Certificate section of the window. Copy that URL for pasting into the Cyral UI.
In Cyral management console, complete the SAML integration
In this final step, you will supply the IdP Metadata URL you copied from Azure to the Cyral management console.
Return to your SAML integration in the Cyral management console. Enter the IdP Metadata URL you retrieved from Azure.
Click Save.
Your SAML Integration is complete.
Next step
See Set up SSO authentication for users for the steps to activate SSO authentication on each repository that will use it.
SCIM with Azure AD
Cyral supports the use of the SCIM protocol to retrieve group information from your Azure AD directory. While Cyral also supports other ways to retrieve group information from Azure AD, the SCIM approach is the only way to get group information for login workflows in which the user does not visit the Cyral Access Portal. For example, a Snowflake login with Cyral SSO relies on Cyral's SCIM integration to retrieve the user's group information.
Prerequisites
Before you set up the SCIM integration, make sure you have:
A working Azure AD SSO integration in Cyral.
tip
Cyral recommends that you create a new Azure AD SSO integration that is not being used in any other Cyral integration in your environment.
Users who will log in with Cyral must have the following identity attributes stored in their Azure AD user record:
first name
last name
username
email
tip
If your Azure AD application uses email addresses as the
usernamevalues, it is possible to populate theemailfield with the value ofusernamein your mappings. See mapping email address as username below.
Get configuration values from the Cyral UI
In the Cyral CP, navigate to Integrations ➡️ SAML ➡️ Configure ➡️ find your SAML SSO integration and click the pencil icon to edit.
Select Enable service account resolution. The Configure Your SCIM Integration panel appears.
Note the value shown in the field, SCIM connector base URL. In the next procedure, you or your SAML administrator will copy this value into SAML. Keep this tab open, or store this value securely until you need it. This value contains the OAuth bearer token, which must be kept secure.
note
The information shown here includes:
- SCIM connector base URL: The base URL for the SCIM integration endpoints.
- Supported provisioning actions: The provisioning actions your SAML app
will take for this integration. In our case, we want the SAML app to:
- Push New Users to Cyral
- Push Profile Updates to Cyral
- Push Groups to Cyral
- Authentication Mode: The method used by SAML to authenticate with Cyral. This will be an OAuth HTTP bearer token.
- Bearer Token: An OAuth access token needed for authentication and authorization with the Cyral SCIM endpoints associated with the given integration instance.
Click Save.
Configure Azure AD
Sign in to your Azure AD portal. Navigate to the Enterprise Application that you have configured for Cyral SSO.
In the app management screen, select Provisioning in the left panel.
Click on Get started.
In the Provisioning Mode menu, select Automatic.
In the Tenant URL field, enter the SCIM connector base URL you copied from the Cyral UI earlier. This is the SCIM base URL of your Cyral SCIM integration. For example:
https://example.app.cyral.com/v1/scim/aad.9ba88b7e-0a2c-4d93-9d62-44deca32109In the Secret Token field, enter the token copied from the Cyral UI's Bearer token field.
Click Test Connection. This should result in a green checkmark (✔️) in the upper right of the Azure AP portal page.
Select Save to save the admin credentials.
Clicking Save activates two more settings sections, Mappings and Settings:
Mappings: Make sure both the mappings for groups and users are Enabled. The default mappings are compatible with the Cyral SCIM service.
tip
If your Azure AD application uses email addresses as the
usernamevalues, it is possible to populate theemailfield with the value ofusernamein your mappings. See mapping email address as username below.Settings: This setting is optional. Add an Email Address where failure notifications can be sent.
Click Save to save your configuration changes.
Refresh the current page and click Edit provisioning. A new configuration field, Scope, appears in the Settings section.
Select Sync only assigned users and groups from the dropdown menu
Set the Provisioning Status to ON and click Save.
To force the sync now:
- Go to the SCIM app page (by refreshing the current screen or by clicking on SCIM app at the top left corner of the page)
- Click on the Refresh icon in the upper right.
Mapping email address as username
If your Azure AD application uses email addresses as the username
values, it is possible to populate the email field with the value of
username while defining the attribute mapping from Azure to the
Cyral SCIM application. In order to do so, please do the following
during step 9a of the ‘Azure Configuration Process’:
Under the Mappings Option, select Provision Azure Active Directory Users
Click on the mapping entry that maps Source attribute
mailto Target attributeemails[type eq "work"].valueIn this entry, change the Source attribute from
mailtouserPrincipalNameClick OK then Save.
Next step
With SCIM configured, your Cyral installation can provide service account resolution for Looker and Tableau, ensuring you know the SSO user identity of users who connect to a repository through a service account. See set-up instructions: