SSO with ADFS
With Cyral, you can authenticate database users against your Active Directory Federation Service (ADFS) identity provider running in Windows Server 2016. Optionally, Cyral can read each user's group memberships from ADFS to determine the user's privileges.
Follow these steps to use your ADFS instance to authenticate database users and Cyral administrators. During this set up, you will configure a Relying Party Trust that connects ADFS and Cyral.
info
If you're using Azure AD, see the section, SSO with Azure AD.
Prerequisites
Make sure the following prerequisites are in place:
- You're running Windows Server 2016 Datacenter edition
- ADFS is activated
- SSL is configured. Cyral does not recommend using a self-signed certificate. If a self-signed certificate is to be used, it must be correctly configured (see for example, these steps.)
- Forms authentication is active for the ADFS server that will receive calls from Cyral. (You have the option to customize it as described here.)
In Cyral management console, create a SAML integration
Log in to your Cyral control plane UI, navigate to the Integrations section, find the SAML integration tile, and click Configure.
Create a new SAML connection:
Specify a Display Name. This display name is used to identify the IdP to the user when they log in.
In Attribute Names in SAML Assertion section, accept the default name for each required SAML attribute (first and last name, email, SSO groups).
Enable IdP-initiated login checkbox: When you add any IdP integration in Cyral, your users can log in using the Cyral Access Portal. If selected, this checkbox gives your users a second way to log in: from your IdP portal.
Set IdP-initiated login to
ONto give users the added option of logging in from your IdP-based portal (for example, an Okta portal).tip
Enabling IdP-initiated login requires a second ACS URL in your SAML app. For details, see SP-initiated and IdP-initiated login, below.
Set IdP-initiated login to
OFFto disable IdP-initiated login. Do this if login is not supported by your IdP, or if you don't want to let users log in from your IdP portal.
Click Continue
On the next screen, download the SP metadata file. You'll need this in the next step to set up your IdP. You are free to close the page. Your SAML Integration will save as a draft, and you will be able to return to it at a later time to finish entering the required configuration values.
Get ADFS properties
- In the Active Directory Server Manager, go to AD FS Management.
- Click on AD FS and choose Edit Federation Service Properties.
- Note the values for
- Federation Service display name
- Federation Service name
- Federation Service identifier
You will need these values later.
Add a relying party trust in ADFS
- In the Active Directory Server Manager, go to AD FS Management.
- Create a connection for Cyral by adding a relying party trust.
Click AD FS: Relying Party Trusts: Add Relying Party Trust
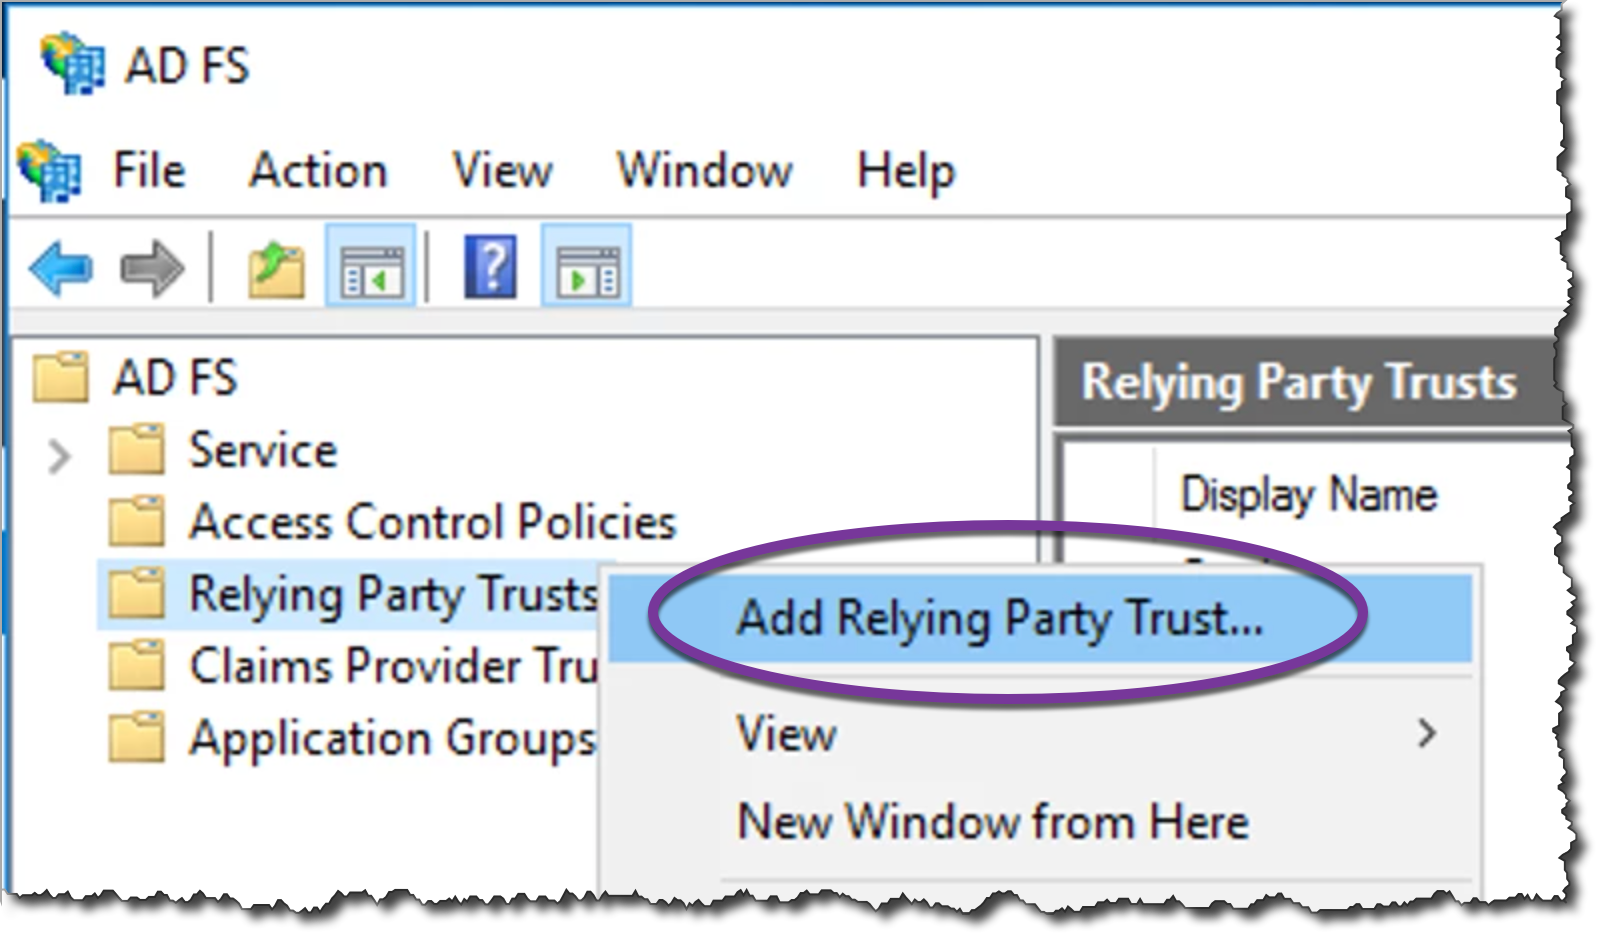
- Select Claims aware and click Start.
- Select Import data about the relying party from file and upload the SP Metadata file you downloaded from the Cyral SP. Click Next.
- Give this trust a Display name and click Next.
- Choose an access policy for your integration. We recommend selecting "Permit specific group", and selecting the Security Groups containing the users that should have access to Cyral. Click Next.
- Proceed through the wizard without further edits.
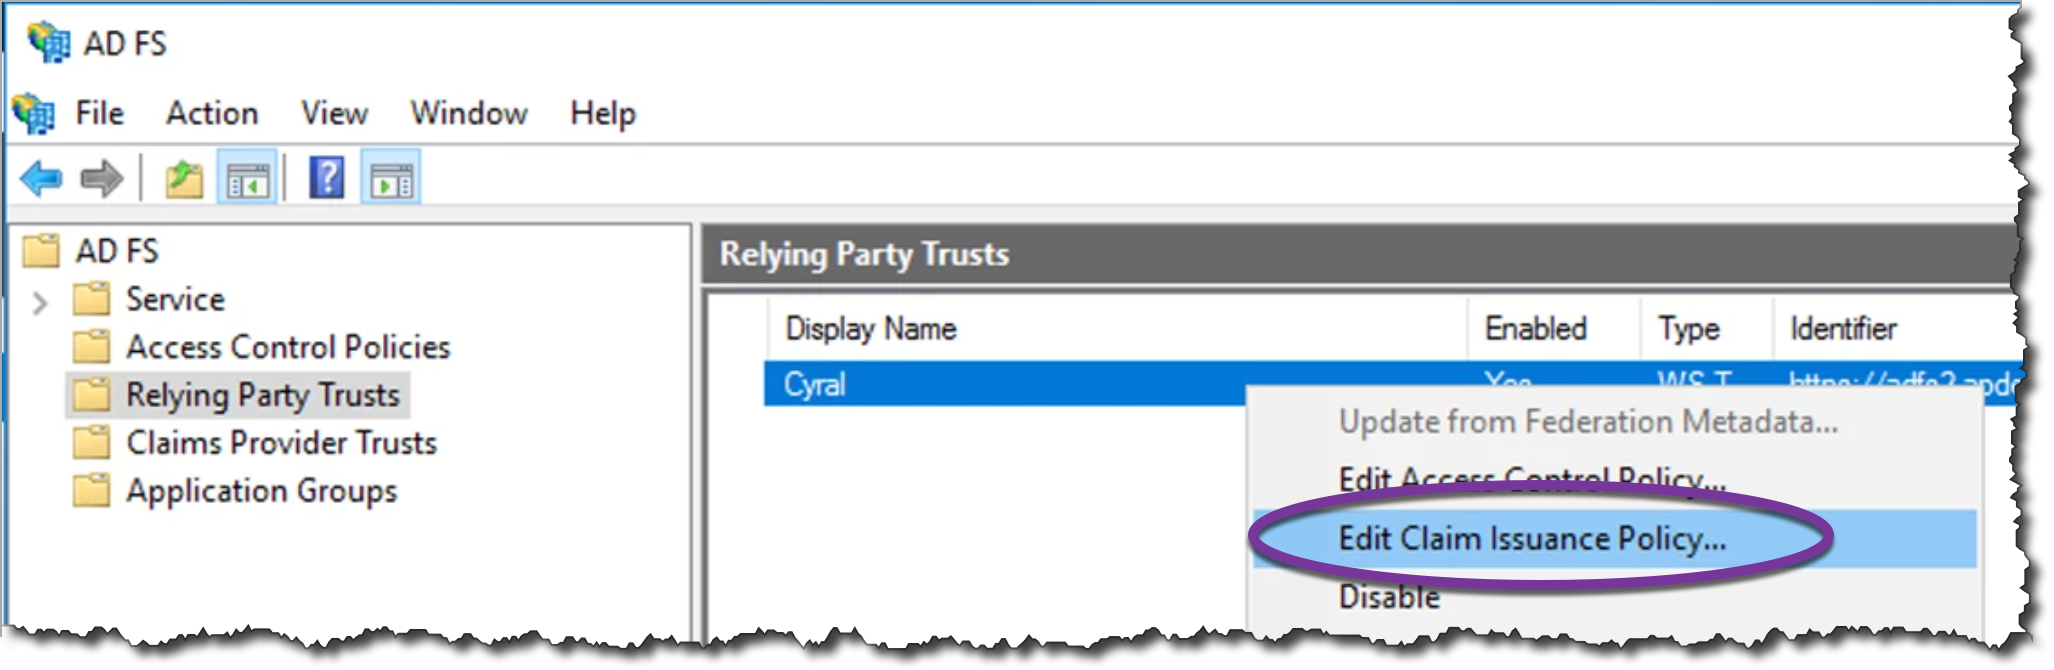
Set up claims
You must create two claims as shown below. Claims direct ADFS to send the correct user information to Cyral as attributes in the SAML Assertion. Values shown are case-sensitive.
- Still working in the Active Directory Server Manager's AD FS Management section, navigate to AD FS: Relying Party Trusts.
- Find the Cyral relying party trust entry that you created in
the preceding section. Right click its name and choose
Edit Claim Issuance Policy.
- Select Add Rule..., then select claim rule template Send LDAP Attributes as Claims. Click Next.
- Create a name for the claim, and select the Attribute Store where your Cyral
users are stored. Enter in the following mappings:
- E-Mail-Addresses:
Name ID - E-Mail-Addresses:
email - Given-Name:
firstName - Surname:
lastName - Token-Groups - Unqualified Names:
memberOf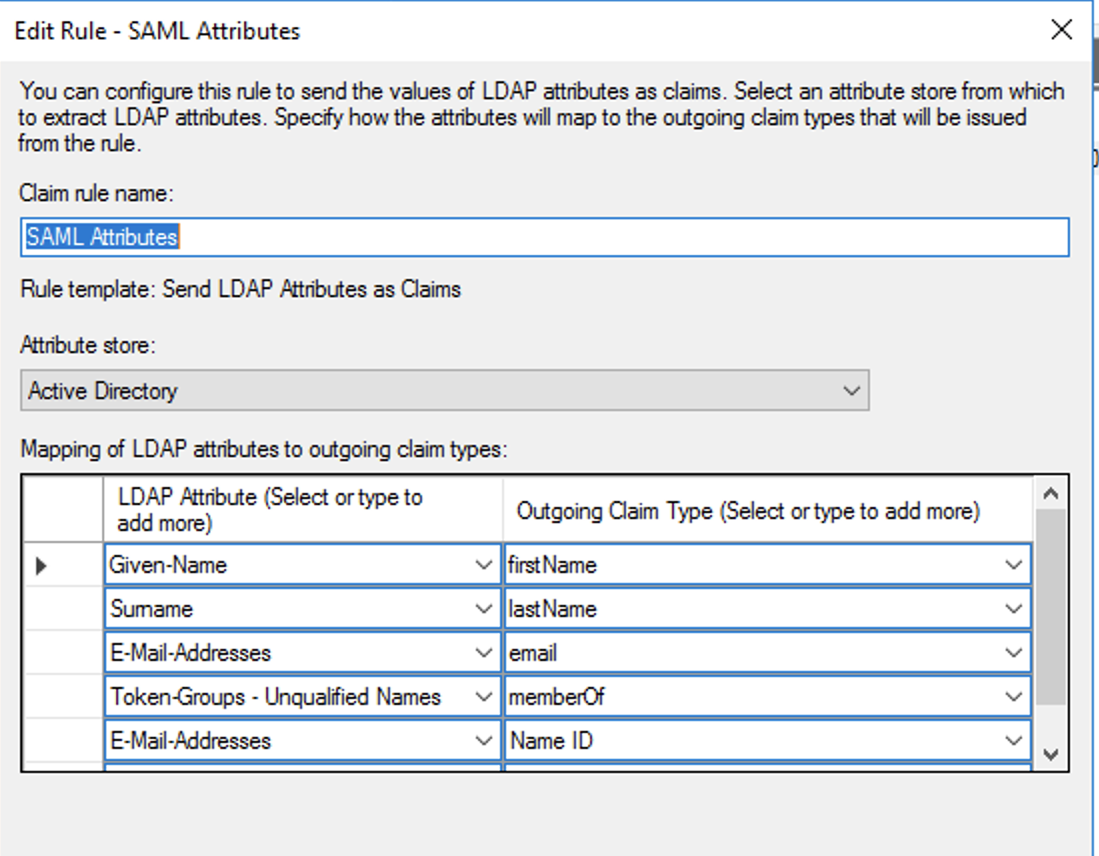
- E-Mail-Addresses:
- Click OK.
Get SAML metadata
Now that you've saved your SAML configuration in ADFS, you can retrieve the SAML metadata file from your ADFS instance.
In your browser, navigate to the SAML IdP Metadata for your ADFS instance. It has the format:
https://$FEDERATION_SERVICE_NAME/FederationMetadata/2007-06/FederationMetadata.xmlThe base URL for this address is the Federation Service name, which can be found in the Service > Federation Service Properties menu of your ADFS server. For example:
https://my_federation_service.com/FederationMetadata/2007-06/FederationMetadata.xmltip
If this document is not available, it's likely that setup hasn't been completed correctly, or that the ADFS server isn't reachable, and debugging should be performed.
The SAML metadata file is a single-line XML document. Here's a partial example:
<EntityDescriptor ID="_t55a1ea-c11b-4091-9555-562026ed5d75" entityID="http://EC2AMAZ-5554MQA.ad.example.com/adfs/services/trust" xmlns="urn:oasis:names:tc:SAML:2.0:metadata">...Download the IdP Metadata.
Your configuration in ADFS is complete.
In Cyral management console, complete the SAML integration
In this final step, you will supply the IdP Metadata you downloaded from ADFS to the Cyral management console.
Return to your SAML integration in the Cyral management console. Upload the IdP Metadata XML file you retrieved from GSuite.
Click Save.
Your SAML Integration is complete.
Next step
See Set up SSO authentication for users for the steps to activate SSO authentication on each repository that will use it.