SSO for Snowflake
Why SSO with Cyral?
With its support for SAML 2.0 federated authentication, Snowflake provides single sign-on (SSO) that lets users authenticate through your identity provider (for example, Okta or Azure AD) in order to access your organization's data in Snowflake.
You can add Cyral protection and policy enforcement to your Snowflake SSO configuration. This allows your users to keep the same, seamless SSO login experience while you gain the security and visibility benefits of Cyral.
To add Cyral to your Snowflake SSO SAML 2.0 configuration, follow the steps in Prerequisites and Configuration in your IdP platform, below.
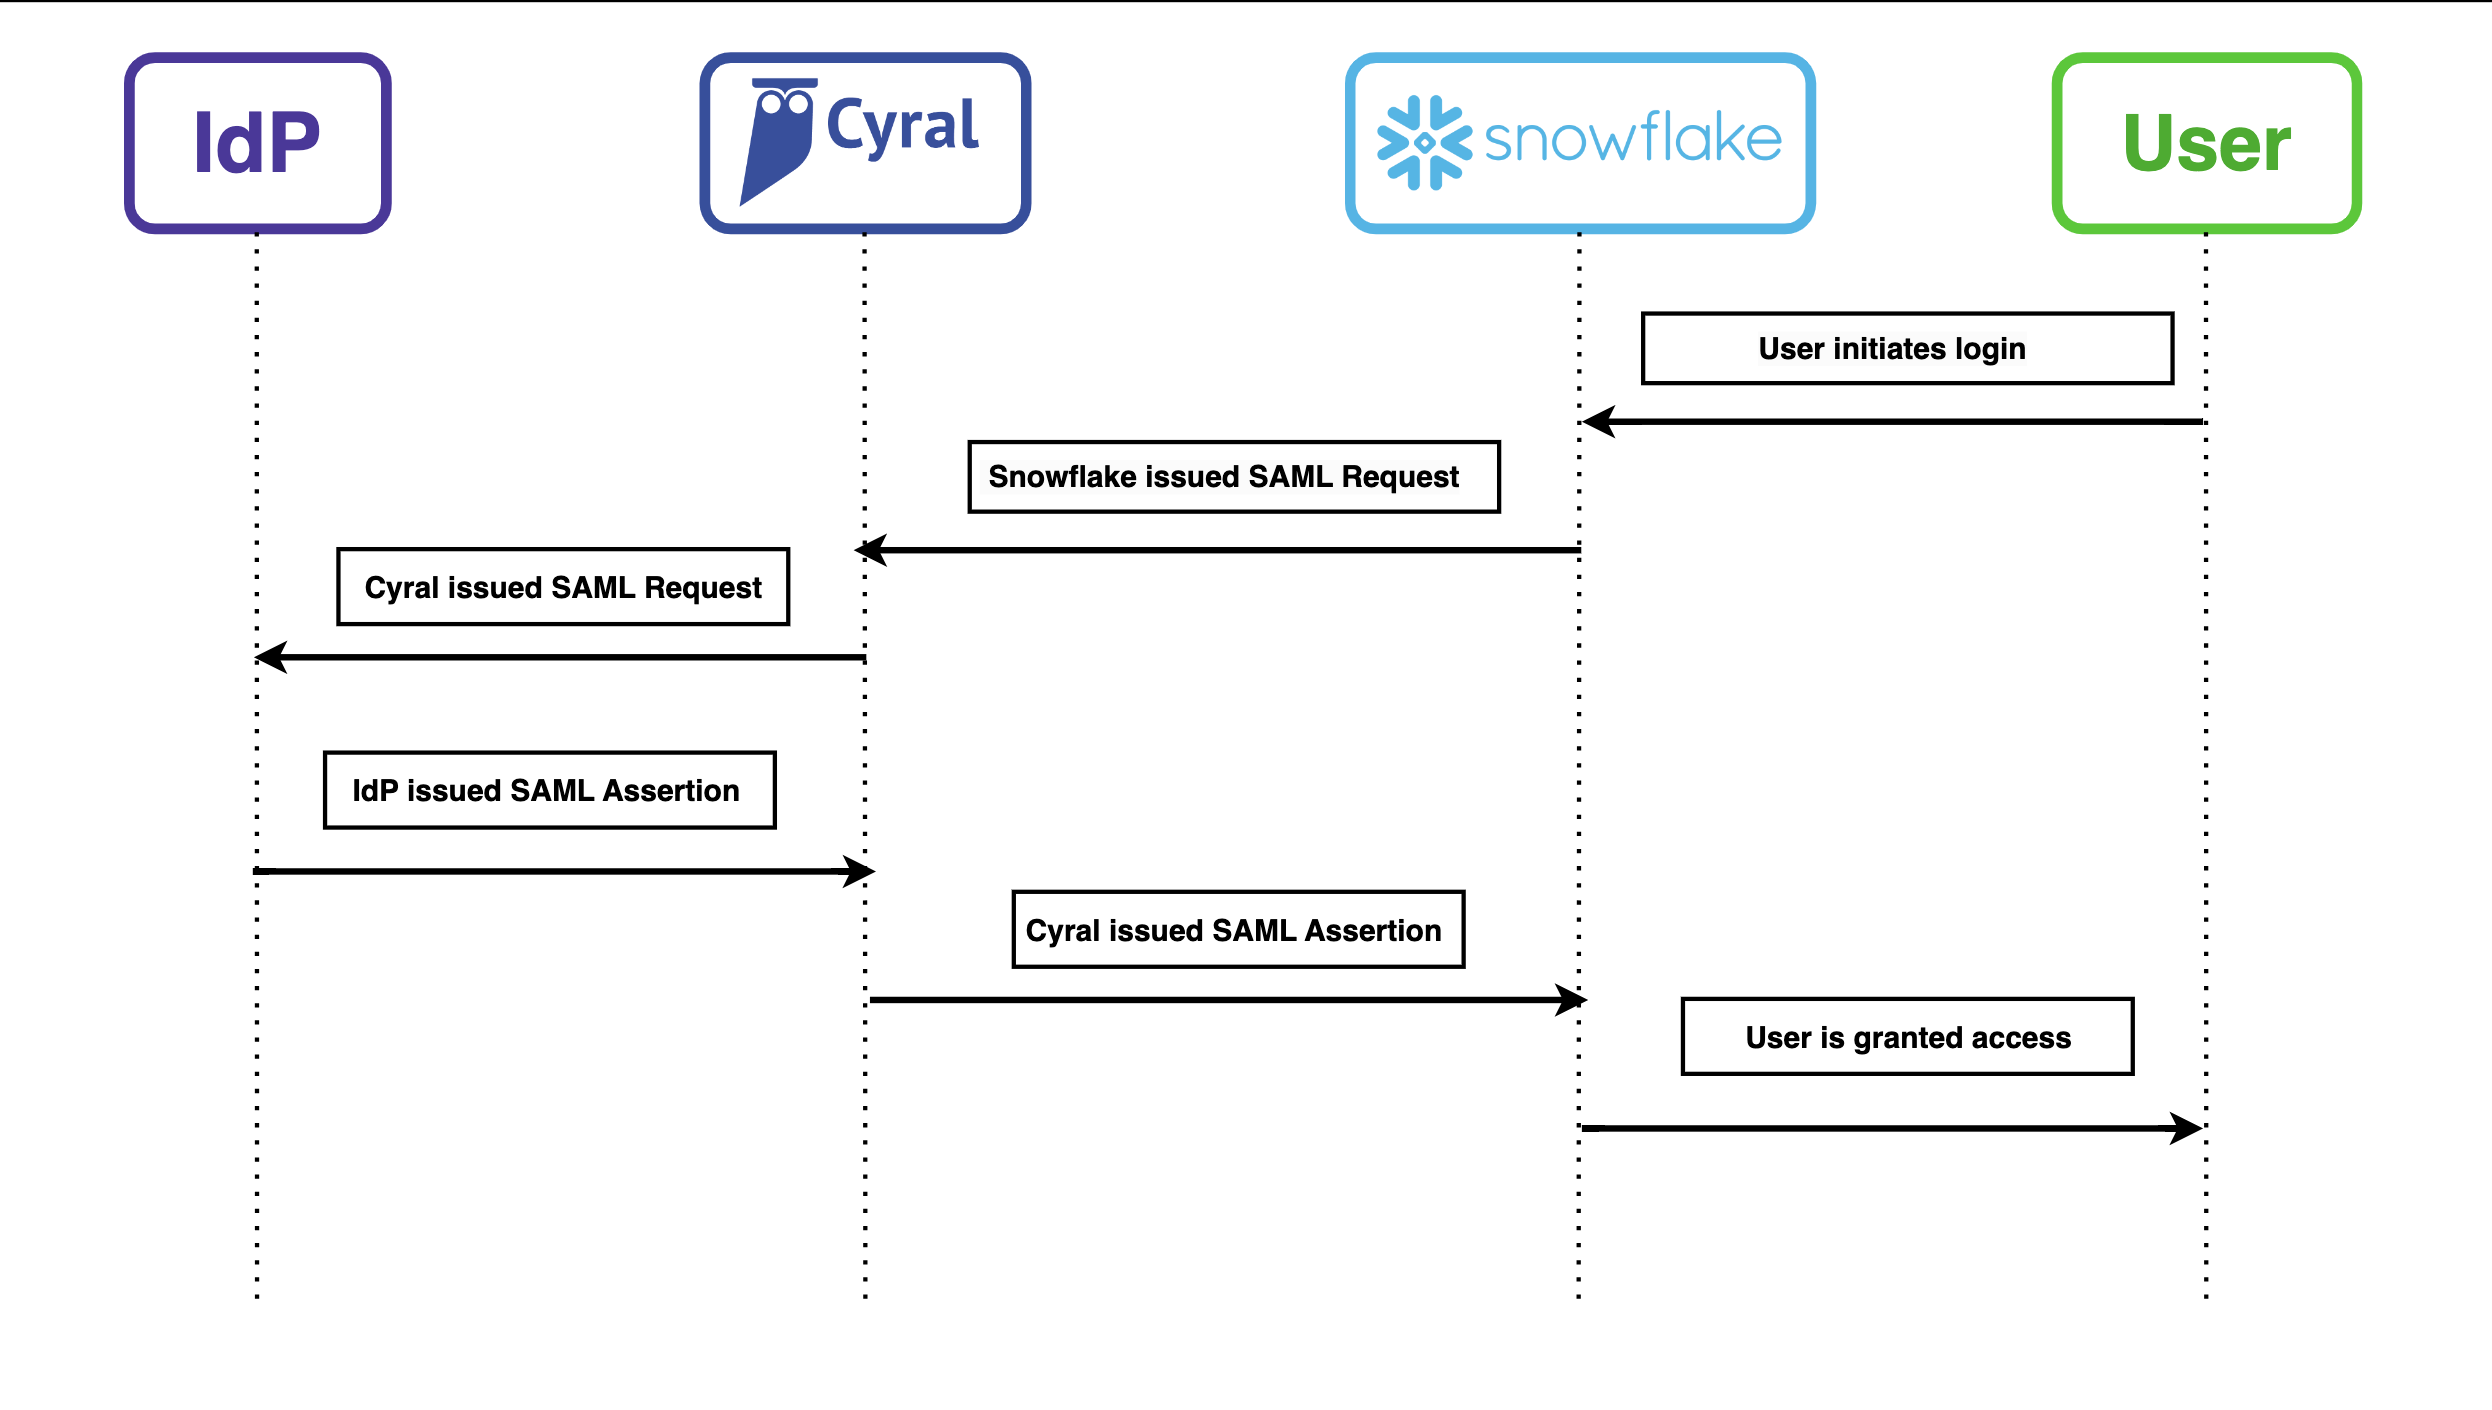
How Cyral fits into your authentication flow
With Cyral added to your Snowflake authentication flow, Snowflake is configured to use the Cyral Sidecar as the identity provider (IdP), and your enterprise IdP is configured to use the Cyral Sidecar as the SAML service provider (SP).
Prerequisites
Make sure you have the following available. You will need them in the configuration steps below:
- Certificate: The Cyral sidecar needs a certificate and private key to sign SAML 2.0 messages when interacting with your IdP and Snowflake to authenticate users. See Get your certificate below.
CYRAL_SIDECAR_DOMAIN: This is the sidecar hostname (also known as Cyral sidecar domain) that is used by data users to connect to the sidecar. See Add a CNAME or A record for a sidecar
Configuration in your IdP platform
Follow the steps for your identity provider (IdP):
Configuration in Okta
Procedure
- Open your Okta Administrator Dashboard.
- Select Applications ➡️ Applications from the sidebar menu on the left to access the your Okta apps.
- Select Create App Integration.
- Select SAML 2.0.
- Select Next
- Enter an App name then select Next.
- Configure the App.
- In SAML Settings section:
- Configure the Single sign-on URL.
- Enter the following value:
https://<CYRAL_SIDECAR_DOMAIN>/fed/login, taking care to replace<CYRAL_SIDECAR_DOMAIN>with the DNS name where your sidecar is reachable. If the Snowflake account is restricted to connect through AWS PrivateLink, then the hostname must have theprivatelink.prefix (i.e.,https://privatelink.<CYRAL_SIDECAR_DOMAIN>/fed/login). - Select Use this for Recipient URL and Destination URL.
- Enter the following value:
- Configure Audience URI (SP Entity ID).
- Enter the following value:
https://<CYRAL_SIDECAR_DOMAIN>.
- Enter the following value:
- Configure the Single sign-on URL.
- In the Attribute Statements section, add an attribute with following inputs:
- Name:
email - Name format:
Basic - Value:
user.email
- Name:
- In the Group Attribute Statements section, add an attribute with following inputs:
- Name:
memberOf - Name format:
basic - Filter:
Matches regex - Value:
.*
- Name:
- Select Next.
- In SAML Settings section:
- Once the SAML App is configured, a screen will display with the
message: Help Okta Support understand how you configured this
application. In this screen:
- Select:
- I'm an Okta customer adding an internal app
- This is an internal app that we have created
- Click Finish.
- Select:
You've completed the configuration in your IdP. Proceed to the next section, Export required values from Okta
Export required values from Okta
Export the SAML app values from Okta for use with Cyral and Snowflake.
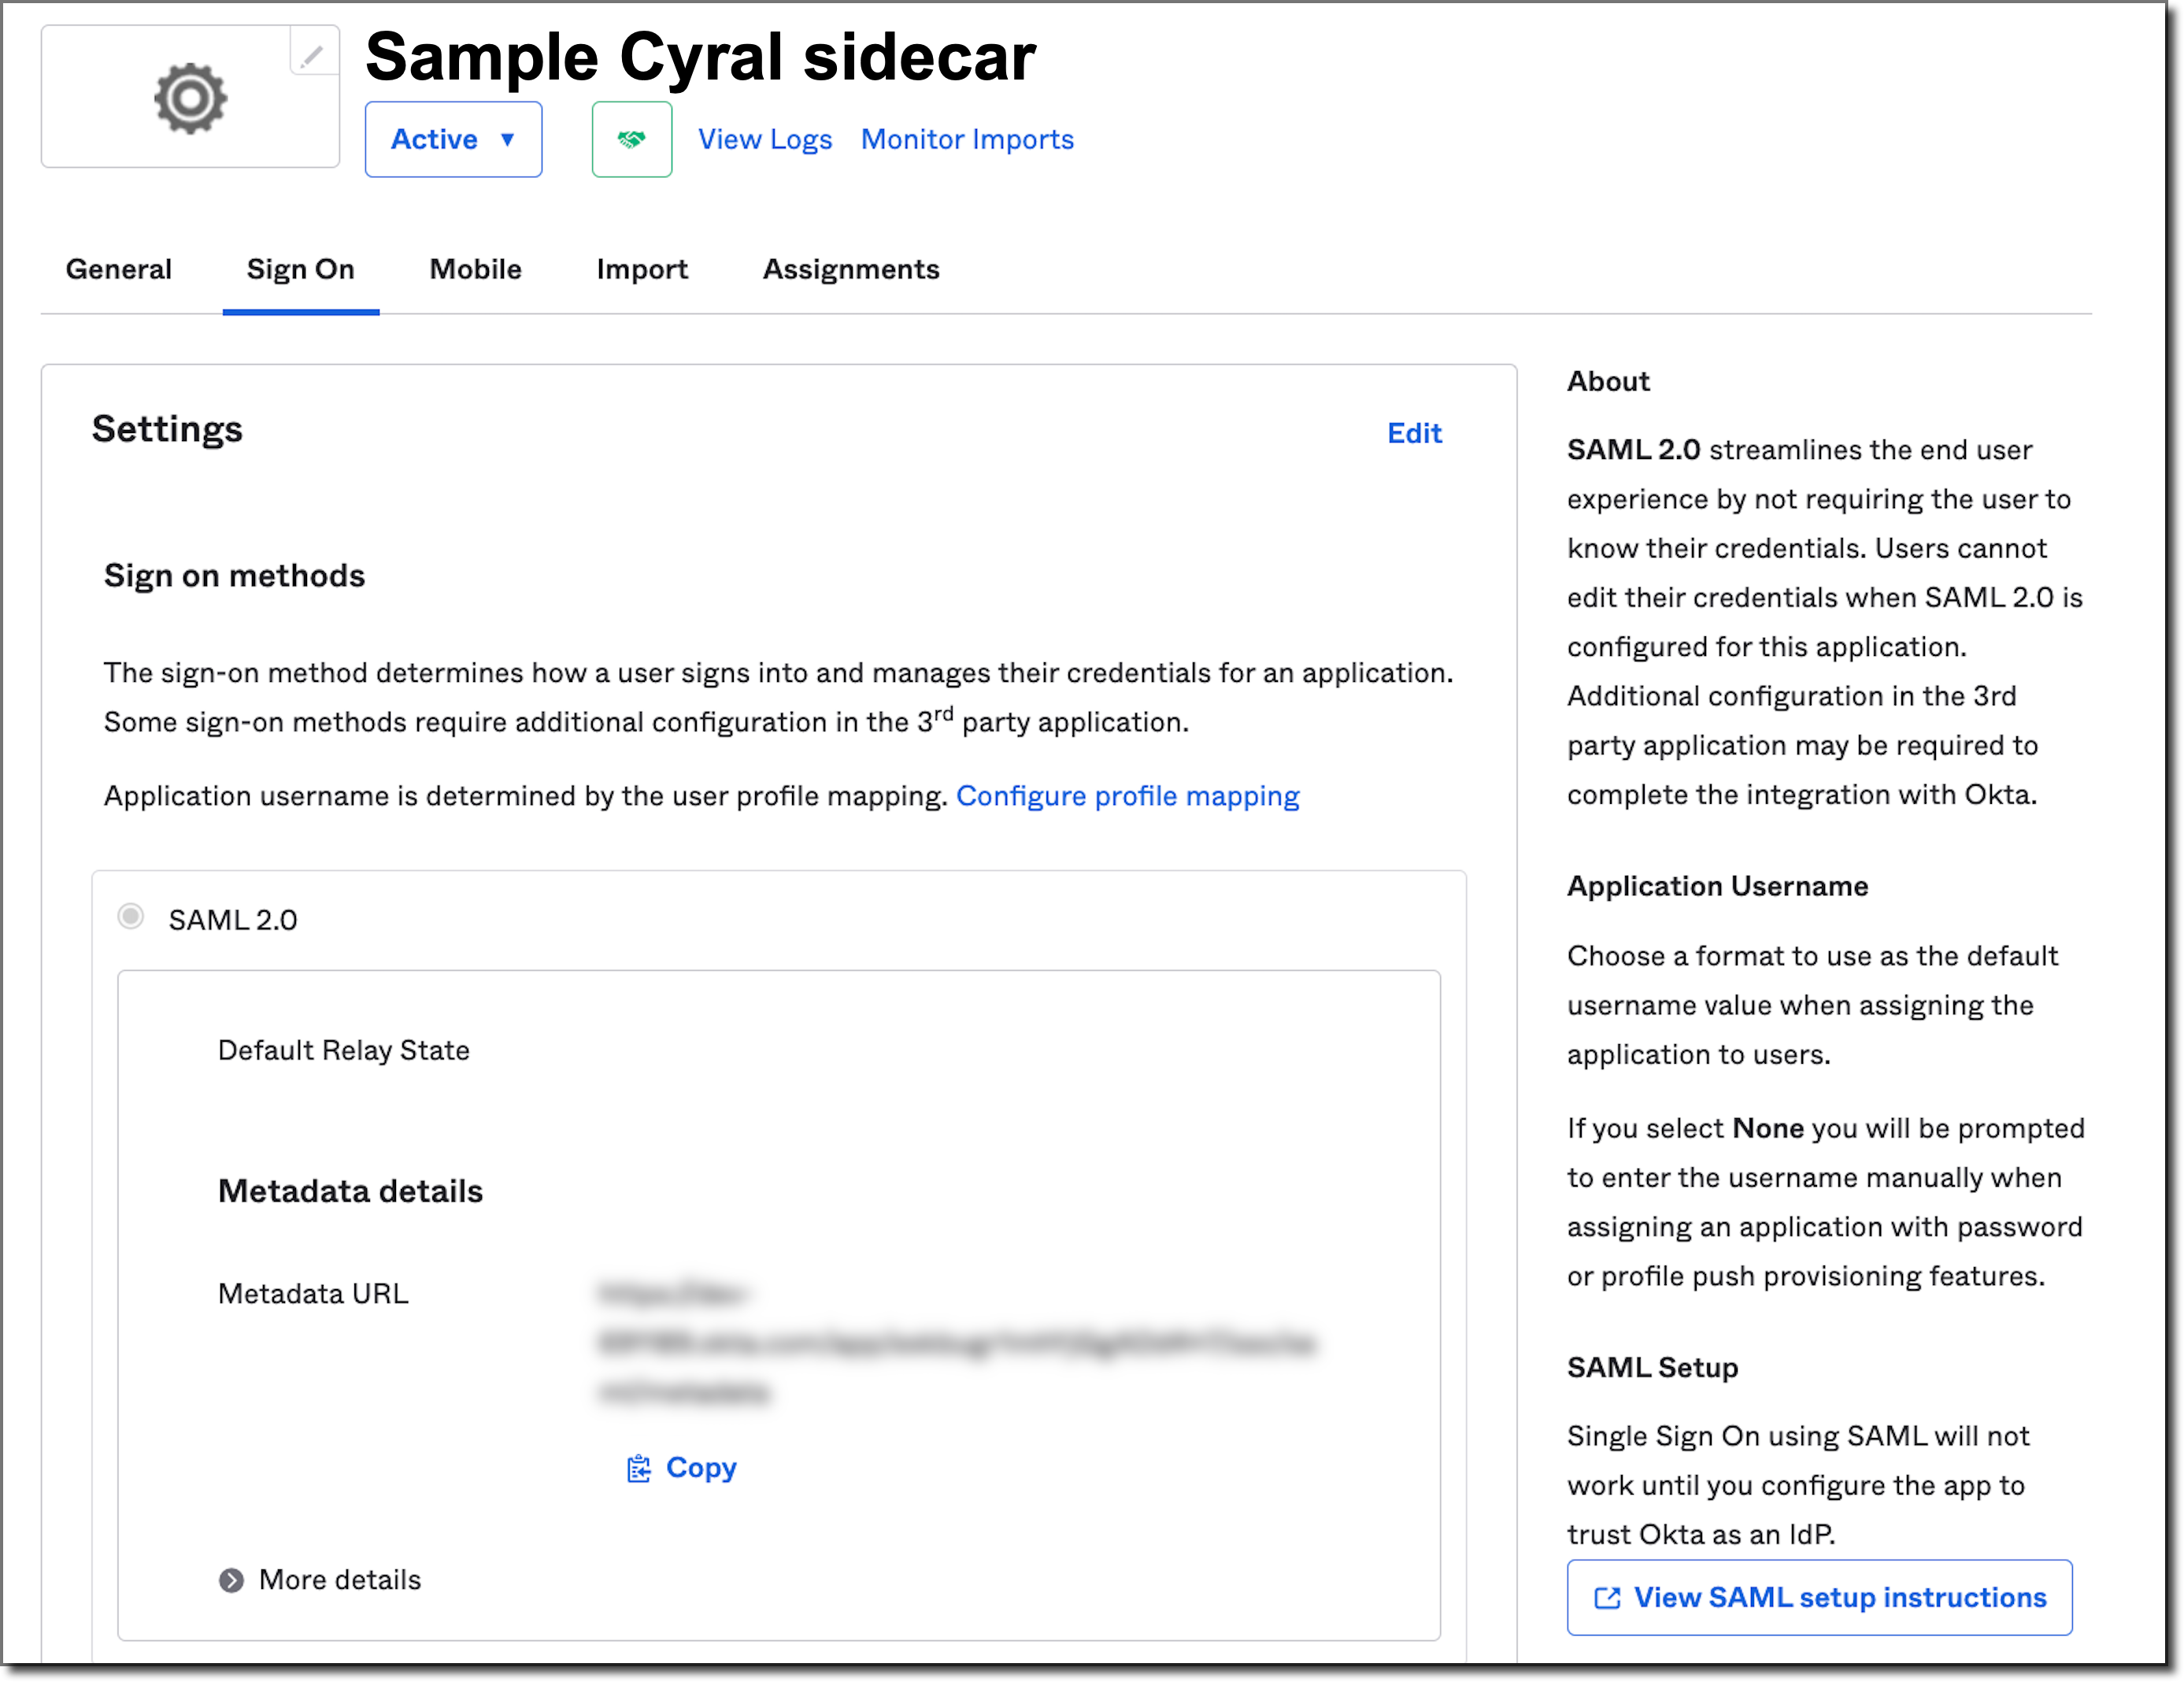
- Still working in the Okta Administrator Dashboard, select the Sign on tab.
- Select View SAML setup instructions. This will open a new tab
containing the SAML information associated with Okta application
you just created.
- Copy the following values, and save them for later:
- Identity Provider Single Sign-On URL. We'll refer to this as the
IDP_SSO_LOGIN_URL. - X.509 Certificate. We'll refer to this as the
IDP_X509_CERT.
- Identity Provider Single Sign-On URL. We'll refer to this as the
- Copy the full certificate, taking care to include its header
(
-----BEGIN CERTIFICATE-----) and its footer (-----END CERTIFICATE-----).
Proceed to Get your certificate, below.
Configuration in Azure AD
Procedure
In your Microsoft Azure portal:
- Search for Azure Active Directory in the search bar and select the Azure AD service.
- Click Enterprise Applications on the left panel, under the Manage section.
Select New application to add a new integration
- Select Create your own application on the top
- Enter a name for your application on the right panel
- Select Integrate any other application you don't find in the gallery (Non-gallery)
- Click Create
On the new application, select Single sign-on on the left panel, under the Manage section.
- Select the SAML tile
Click to edit the Basic SAML Configuration section
- Click Add identifier and set
https://<CYRAL_SIDECAR_DOMAIN>as identifier (note that<CYRAL_SIDECAR_DOMAIN>here is a placeholder and must be replaced.) - Click Add reply URL and set
https://<CYRAL_SIDECAR_DOMAIN>/fed/loginas the reply URL. - Click Save at the top of the right panel
- Click Add identifier and set
Click to edit the Attributes & Claims section
Delete all the pre-defined additional claims by clicking on the three dots and Delete for row in the table and then confirming with OK
Click to Add new claim for email
- Set Name as email
- Enter an empty string as the Namespace value.
- Select user.mail as Source attribute
- Click Save
Click to Add a group claim
Select All groups
Select sAMAccountName for Source Attribute.
note
If sAMAccountName is not available with your AD instance (if your Azure AD tenant is not synchronized with an on-premises Active Directory using AAD Connect Sync 1.2.70.0), then you can select Group ID to be sent in the SAML assertion instead. If this option is the only one available, all groups will be sent as group IDs rather than as names. As a result, you must define Cyral policies based on these group IDs rather than group names.
Click to expand Advanced options
Check Customize the name of the group claim
Set memberOf for Name
Enter an empty string as the Namespace value.
Click Save
The completed configuration should look similar to the Azure AD sample screen shown below.

Export required values from Azure AD
Export the SAML app values from Azure AD for use with Cyral and Snowflake.
- Download the base64 encoded certificate from the SAML
Certificates and replace line breaks with
\n. You'll use the certificate later in this procedure as theIDP_CERTIFICATEin the sidecar deployment parameters. - Copy the Login URL from the Set up (YOUR-APP-NAME) section.
You'll use this later in this procedure as the
SSO_LOGIN_URLin the sidecar deployment parameters.
You've completed the configuration in your IdP. Proceed to the next section, Get your certificate
Get your certificate
The Cyral sidecar needs a certificate and private key to sign SAML 2.0 messages when interacting with your IdP and Snowflake to authenticate users.
Generate a new certificate (CSR) now, and have it signed by your usual certificate authority (CA).
note
For testing, you may elect to generate and self-sign a certificate key pair for your sidecar-Snowflake SSO configuration. This is not recommended for a production deployment! For example:
openssl req -x509 -new -newkey rsa:2048 -nodes -subj '/C=US/ST=California/L=San Francisco/O=Cyral/CN=Cyral Identity Provider' -keyout cyral-idp-private-key.pem -out cyral-idp-public-cert.pem -days 7300`
For the SSO configuration, you'll need:
- The x509 certificate, which we'll call
SIDECAR_X509_CERTin these instructions. (For example, using the self-signed instructions above would result in a public cert file called,cyral-idp-public-cert.pem.) - The private key, which we'll call
SIDECAR_PRIVATE_KEY. (For example, using the self-signed instructions above would result in a private key file called,cyral-idp-private-key.pem.)
Redeploy the sidecar with configuration information
Follow the instructions for your environment:
Redeploy with an env file
Create an .env file as shown below. Place this file in the same
directory as your sidecar.compose.yaml file.
In the .env file, include:
SSO_LOGIN_URL: theIDP_SSO_LOGIN_URLyou copied earlierIDP_CERTIFICATE: theIDP_X509_CERTyou saved earlierSIDECAR_IDP_PRIVATE_KEY: theSIDECAR_PRIVATE_KEYyou saved earlierSIDECAR_IDP_PUBLIC_CERT: theSIDECAR_X509_CERTyou saved earlierSIDECAR_ENDPOINT: theCYRAL_SIDECAR_DOMAIN(also known as the sidecar hostname) that is used by data users to connect to the sidecar
Certificate formatting guidelines:
- For certificates, include the header and footer,
-----BEGIN CERTIFICATE------and-----END CERTIFICATE------, respectively. - For keys, include the header and footer,
-----BEGIN PRIVATE KEY-----and-----END PRIVATE KEY-----, respectively. - Pass the certificates and keys exactly as they are written in Okta or on the files you generated, including the newline characters.
The .env file uses this format:
# Okta SAML vars
SSO_LOGIN_URL=<IDP_SSO_LOGIN_URL>
IDP_CERTIFICATE=<IDP_X509_CERT>

# Sidecar SAML vars
SIDECAR_IDP_PRIVATE_KEY=<SIDECAR_PRIVATE_KEY>
SIDECAR_IDP_PUBLIC_CERT=<SIDECAR_X509_CERT>
SIDECAR_ENDPOINT=<CYRAL_SIDECAR_DOMAIN>
Once the sidecar has been deployed, proceed to Configure your Cyral sidecar as the IdP in Snowflake, below.
Redeploy on AWS
Using CloudFormation
Pass the environment variables displayed below to the sidecar via the AWS parameters:
IdPSSOLoginURL: theIDP_SSO_LOGIN_URLyou copied earlierIdPCertificate: theIDP_X509_CERTyou saved earlierSidecarPrivateIdPKey: theSIDECAR_PRIVATE_KEYyou saved earlierSidecarPublicIdPCertificate: theSIDECAR_X509_CERTyou saved earlierSidecarDNSName: theCYRAL_SIDECAR_DOMAIN(also known as the sidecar hostname) that is used by data users to connect to the sidecar
Using Terraform
Pass the Terraform variables displayed below to the sidecar:
idp_sso_login_url: theIDP_SSO_LOGIN_URLyou copied earlieridp_certificate: theIDP_X509_CERTyou saved earliersidecar_private_idp_key: theSIDECAR_PRIVATE_KEYyou saved earliersidecar_public_idp_certificate: theSIDECAR_X509_CERTyou saved earliersidecar_dns_name: theCYRAL_SIDECAR_DOMAIN(also known as the sidecar hostname) that is used by data users to connect to the sidecar
Certificate formatting guidelines
- For certificates, include the header and footer,
-----BEGIN CERTIFICATE------and-----END CERTIFICATE------, respectively. - For keys, include the header and footer,
-----BEGIN PRIVATE KEY-----and-----END PRIVATE KEY-----, respectively. - Pass the certificates and keys mostly as they are written in Okta or
in the files you generated, but replace each newline character with
\n. Make sure each certificate is provided in a single line of text.
Once the sidecar has been deployed, proceed to Configure your Cyral sidecar as the IdP in Snowflake, below.
Configure your Cyral sidecar as the IdP in Snowflake
Check for existing configurations
Make sure you don't have any other SAML2 Security Integrations configured in Snowflake.
- Log into your Snowflake account with a user that has been granted the
ACCOUNTADMINrole. - Run the command:
show integrations; - Check the output. Find any integrations of type SAML2, and check
if they're enabled. Below is an example of an existing SAML2
integration that is enabled:
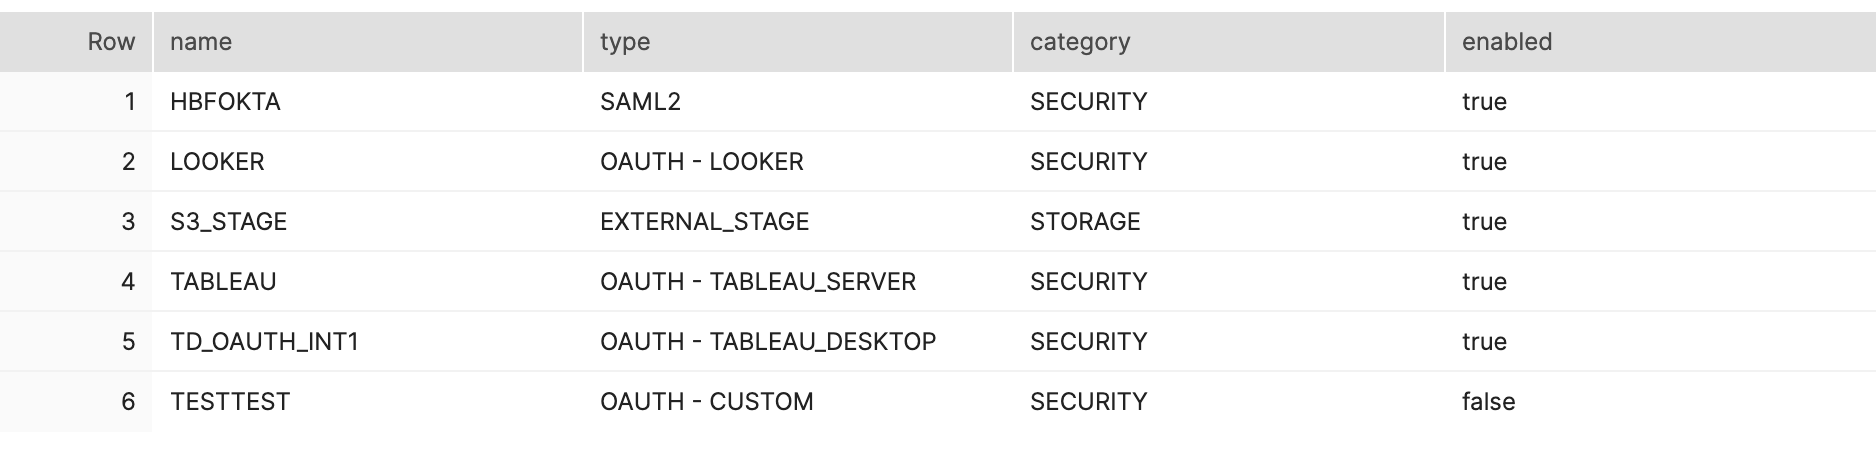
- If you find an enabled integration, run the following command to
disable it. In this command, replace
INTEGRATION_NAMEwith the found in the name column of the output fromshow integrations:alter security integration <INTEGRATION_NAME> set ENABLED = false;
Once you've made sure there are no active SAML2 integrations, proceed to Create a new SAML2 security integration, below.
Create a new SAML2 security integration.
Make sure you're logged in to your Snowflake account with a user that has been granted the
ACCOUNTADMINrole.Create a new SAML2 Security Integration by running the following SQL query in Snowflake:
create security integration my_idp
  TYPE = saml2
  ENABLED = true
  SAML2_ISSUER = 'https://<CYRAL_SIDECAR_DOMAIN>'
  SAML2_SSO_URL = 'https://<CYRAL_SIDECAR_DOMAIN>/session/v1/CyralSSOLogin'
  SAML2_PROVIDER = '<YOUR_IDP_PLATFORM>'
  SAML2_ENABLE_SP_INITIATED = true
  SAML2_SP_INITIATED_LOGIN_PAGE_LABEL = '<DISPLAY_NAME>'
SAML2_X509_CERT = '<SIDECAR_X509_CERT>';note
- If the Snowflake account is restricted to connect through
AWS PrivateLink, you also need to update
SAML2_SNOWFLAKE_ACS_URLandSAML2_SNOWFLAKE_ISSUER_URLin the security integration. Check Snowflake docs for details. - Do not add a trailing slash to any URLs. Doing so may lead you to encounter the error "SAML response invalid or matching user not found."
- Replace
YOUR_IDP_PLATFORMwithOKTAorADFSto match your IdP type. - Whatever you pass as the
DISPLAY_NAMEabove will appear as the SSO login option on the Snowflake login page. - When passing the sidecar certificate to Snowflake, follow these
formatting rules:
- Omit the header and footer when you pass the
<SIDECAR_X509_CERT>. In other words, pass the certificate without the the header-----BEGIN CERTIFICATE------and footer-----END CERTIFICATE------. - Format the certificate on a single line without line breaks. An easy way to do this is to copy the certificate into a search bar, and then re-copy it from there. There is no need to worry about the newline characters or spaces.
- Omit the header and footer when you pass the
- If the Snowflake account is restricted to connect through
AWS PrivateLink, you also need to update
Your Snowflake installation is now configured to rely on Cyral and your IdP for SSO. Finally, you should Enable SCIM between Cyral and your IdP.