Network Shield
You can set Network Shield rules that limit who can connect to a repository based on where (source IP address) they're trying to connect from. You can scope each rule so that it applies to specific database users or to all database users. Likewise, you can create a rule that grants access to a specific database user, regardless of where they connect from.
info
Network Shield is supported only for Oracle and Microsoft SQL Server repositories.
You set location-based access rules in the Network Shield section of the Cyral control plane UI as explained in Add Network Shield rules for a repository, below.
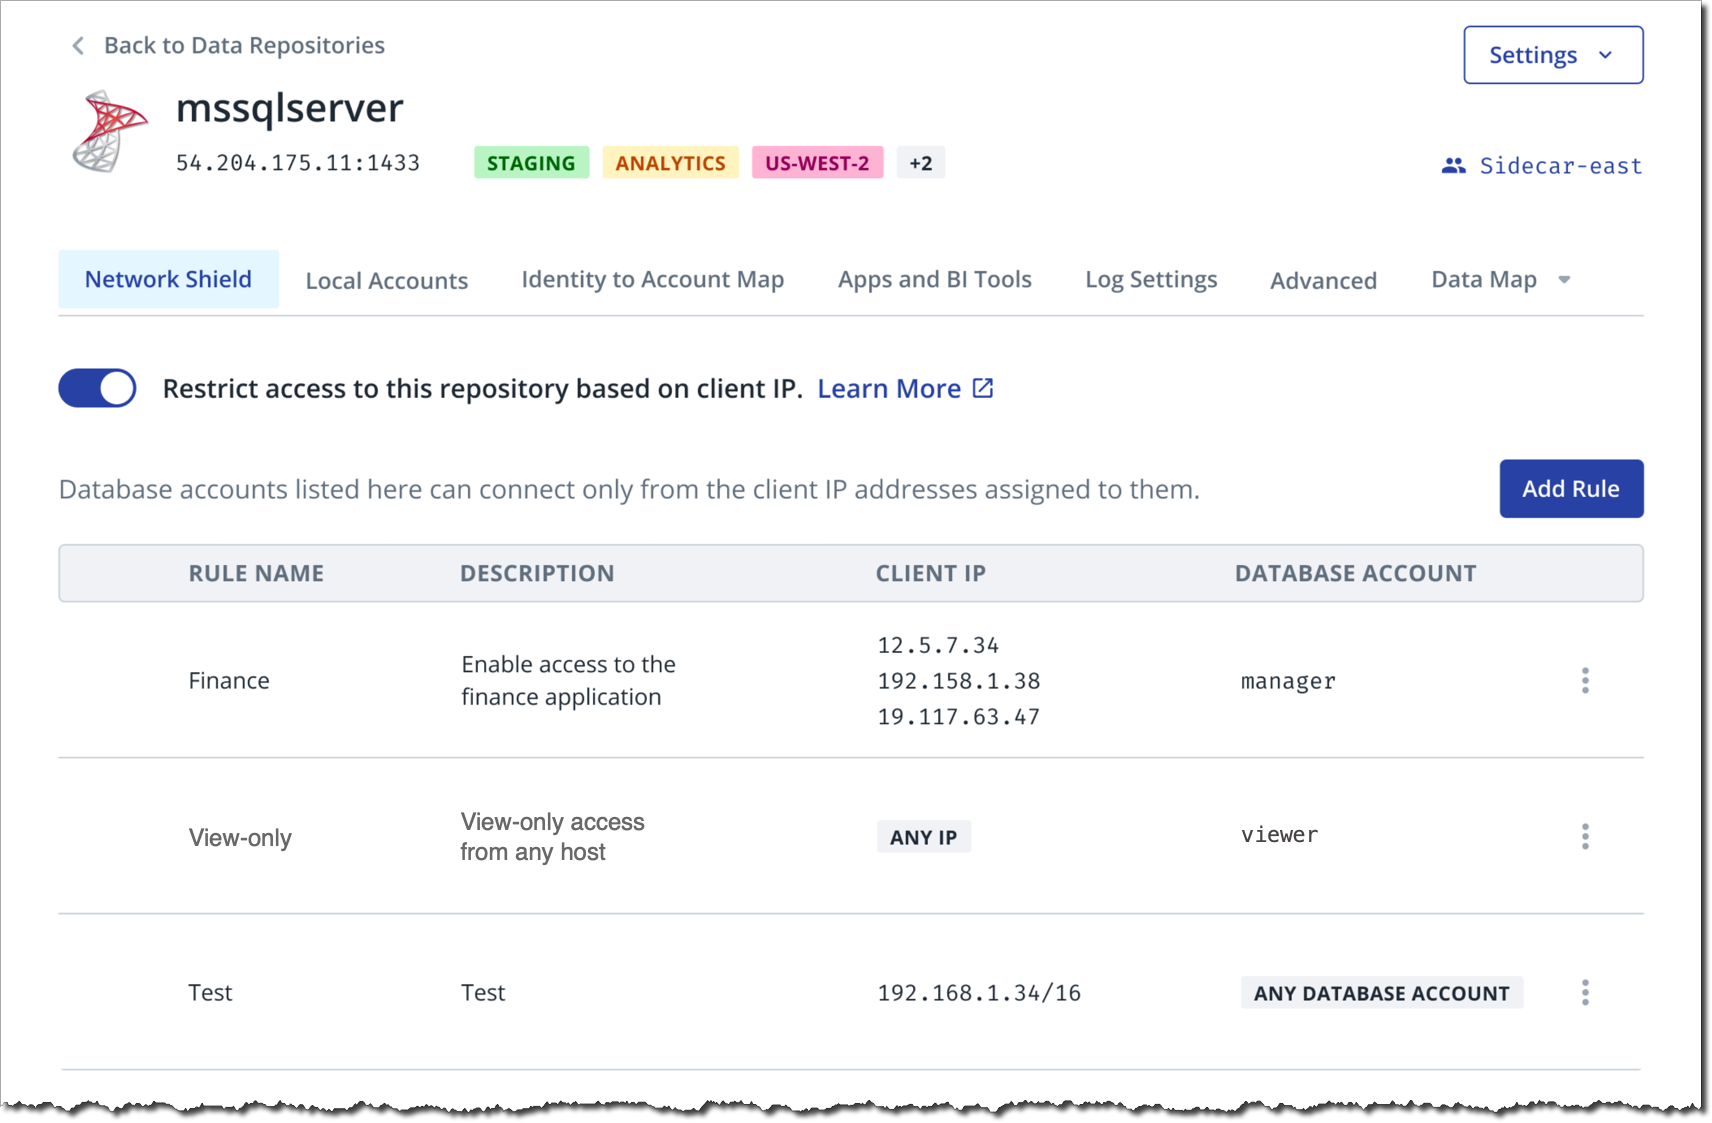
For example, in the rules shown above:
- the Finance rule allows people to connect to the
mssqlserverdatabase with themanagerdatabase account, provided they are connecting from source IP address12.5.7.34,192.158.1.38, or19.117.63.47; - the View-only rule allows people to connect to the
mssqlserverdatabase with theviewerdatabase account from anywhere; - the Test rule allows all Cyral-configured database accounts to
connect to the
mssqlserverdatabase from the192.168.1.34/16subnet. For security, you would create anANY DATABASE ACCOUNTrule only for subnets or addresses whose availability is limited to trusted staff.
tip
Q: What is a database account?
A: A database account is any database-native or cloud storage-native account used to connect to the repository.
Add Network Shield rules for a repository
Network Shield operates as an allowlist. To use Network Shield, you'll add a rule for each database user who can connect, specifying which addresses that user can connect from. Once your rules are in place, you'll enable Network Shield by toggling the setting Restrict access to this repository based on client IP to ON.
With Network Shield enabled, each connection attempt must match one of your rules, or it will be disallowed.
Add rules to the allowlist as shown below:
Prerequisites
- Track your database as a repository in Cyral
- Bind a repository to a sidecar to protect it
Procedure
Click Data Repos ➡️ click your repo's name ➡️ Network Shield.
Click Add Rule
In the Add Rule window, provide a Name and optional Description for the rule.
In the Client IP section, add the allowlist of IP addresses that this rule allows client connections from.
- Click Specify IPs
- In the field that appears, add an IPv4 address.
caution
Make sure the allowed IP addresses in your Network Shield rules are also allowed by the database inbound rules of your deployed sidecar. For sidecars deployed via Terraform, see the notes on network access control to the sidecar instance.
- If more addresses are needed, click Add IP and add them.
- Click the 🗑️ (wastebasket icon) to remove unwanted addresses from this rule.
tip
You can create a rule that allows one or more database accounts to connect from anywhere. There are two ways to do this:
- Don't add any IP addresses in the Client IP section; or
- Specify
0.0.0.0/0as the only IP address in the rule.
In the Database Account section, specify who can connect from the addresses listed in this rule.
- Click Specify Accounts
- In the field that appears, add a database account name.
info
A database account is any native account that's used to connect to the database.
- If more accounts will connect under this rule, click Add Account and add their names.
- Repeat the preceding step to add more database accounts if needed.
- Click the 🗑️ (wastebasket icon) to remove unwanted accounts from this rule.
tip
You can create a rule that allows any authorized user to connect from any of the addresses in this rule's allowlist. To do this:
- Don't add any accounts in the Database Accounts section.
Click Add Rule.
Add additional rules for this repository if needed.
If you wish to activate Network Shield for this repository now, toggle ON the option to Restrict access to this repository based on client IP. Once this setting is ON, Cyral enforces your rules. Any access attempt blocked by the rules will be noted in the Cyral logs.
Edit a Network Shield rule
Click Data Repos ➡️ click your repo's name ➡️ Network Shield.
Find your rule in the list, and click the three-dots icon on the right, and choose Edit to edit it.
See Add Network Shield rules for a repository for details.
Delete a Network Shield rule
Click Data Repos ➡️ click your repo's name ➡️ Network Shield.
Find your rule in the list, and click the three-dots icon on the right, and choose Delete to delete it.
Turn on Network Shield for a repository
Click Data Repos ➡️ click your repo's name ➡️ Network Shield.
Make sure you've added Network Shield rules for the repository.
Toggle ON the option to Restrict access to this repository based on client IP. Once this setting is ON, Cyral enforces your rules. Any access attempt blocked by the rules will be noted in the Cyral logs.
Turn off Network Shield for a repository
Click Data Repos ➡️ click your repo's name ➡️ Network Shield.
Toggle OFF the option to Restrict access to this repository based on client IP. Once you've made this change, authorized users can connect to this repository from any source IP address.