Authenticate repository access with SSO
With Cyral, you can authenticate data repository users against your enterprise single sign-on (SSO) platform. By ensuring that data repository users log in with their SSO credentials, you ensure your data access logging reflects people's true identities. You also have the option to grant access based on a user's group memberships in the SSO platform.
Prerequisites
Before you set up SSO for a repository, make sure you've completed these steps:
Procedure
Add the local account credentials to your secrets manager
Each SSO user will map to a local account on your data repository
(a user account saved in the repository service, DBaaS, or
DBMS). For example, SSO user Frank Hardy might map to a local account
— a PostgreSQL user — called analyst. For each local account, store
its database credentials as a secret in your secrets manager.
Your credentials secret must contain:
- the
username— the local user account name as stored in the repository system, like a PostgreSQL username, for example. Don't worry about the SSO user or group names now; you'll map those later in the Cyral UI. - the
password— the local user's password used for direct authentication to the repository system
Choose the tab below that corresponds to your secrets storage type:
- AWS Secrets Manager
- Kubernetes Secrets
- GCP Secret Manager
- Environment variable
To use AWS Secrets Manager, store the local account credentials as a JSON blob. The secret's name must start with the prefix /cyral/dbsecrets/, which will become part of its ARN.
The JSON blob must follow one of the formats shown below. Cyral supports:
- a single set of credentials (username/password) for one database, or
- a list of credentials for multiple databases, where each set of credentials is identified for each database
For singular database accounts, store the local account credentials in the JSON format shown below.
{
"username": "someuser",
"password": "somepassword",
"databaseName": "db1"
}
Note that databaseName is optional for singular credentials.
For multiple database accounts, store the local account credentials in the following JSON format:
[ {
"username": "someuser",
"password": "somepassword",
"databaseName": "db1"
},
{
"username": "someuser",
"password": "anotherpassword",
"databaseName": "db2"
}
]
Note that for multiple database accounts, databaseName is required so the sidecar can identify which database the credentials belong to.
See the AWS Secrets Manager tutorial for help storing secrets.
To use Kubernetes Secrets, store the local account credentials as a JSON blob in one of the formats shown below.
You must create the secret in the same Kubernetes namespace where the sidecar is deployed.
Cyral supports secrets that contain:
- a single set of credentials (username/password) for one database, or
- a list of credentials for multiple databases, where each set of credentials is identified for each database
For singular database accounts, store the local account credentials in the JSON format shown below.
{
"username": "someuser",
"password": "somepassword",
"databaseName": "db1"
}
Note that databaseName is optional for singular credentials.
For multiple database accounts, store the local account credentials in the following JSON format:
[ {
"username": "someuser",
"password": "somepassword",
"databaseName": "db1"
},
{
"username": "someuser",
"password": "anotherpassword",
"databaseName": "db2"
}
]
Note that for multiple database accounts, databaseName is required so the sidecar can identify which database the credentials belong to.
You must create the database local account secret in Kubernetes before you add it to a data repository in Cyral. You can add the secret using various Kubernetes interface tools (see their documentation on creating secrets).
For example, using kubectl, you can create a secret named db-secrets with the credentials stored in the secret data key as follows:
kubectl create secret generic db-secrets \
--from-literal=secret='{
"username": "someuser",
"password": "somepassword",
"databaseName": "db1"
}'
Additionally, the sidecar will require sufficient permissions within Kubernetes itself to read secrets using the Kubernetes API. The Cyral sidecar Helm chart creates and uses a Kubernetes service account with sufficient permissions by default, and if you are using that, there are no actions required. This advice only applies if you are using your own (pre-created, in this documentation's terms) service account. For details, see the section, Deploy sidecar with a pre-created service account.
To use Google Cloud Secret Manager, store the local account credentials as a JSON blob in Google Cloud Secret Manager, using one of the formats shown below. Cyral supports secrets that contain:
- a single set of credentials (username/password) for one database, or
- a list of credentials for multiple databases, where each set of credentials is identified for each database
For singular database accounts, store the local account credentials in the JSON format shown below.
{
"username": "someuser",
"password": "somepassword",
"databaseName": "db1"
}
Note that databaseName is optional for singular credentials.
For multiple database accounts, store the local account credentials in the following JSON format:
[ {
"username": "someuser",
"password": "somepassword",
"databaseName": "db1"
},
{
"username": "someuser",
"password": "anotherpassword",
"databaseName": "db2"
}
]
Note that for multiple database accounts, databaseName is required so the sidecar can identify which database the credentials belong to.
You must create the database local account secret in Google Cloud Secret Manager before you add it to a data repository in Cyral. You can add a secret as explained in the Google Cloud documentation).
To store local account credentials as an environment variable on the sidecar host, create the environment variable on your sidecar host and configure the sidecar to fetch the environment variable.
Note:
- The variable name must start with the prefix
CYRAL_DBSECRETS_ - The contents of the variable must be formatted as a JSON blob as shown in the examples below. You can use:
- a single set of credentials (username/password) for one database, or
- a list of credentials for multiple databases, where each set of credentials is identified for each database
For singular database accounts, store the local account credentials in the JSON format shown below. You must create the secret in the same Kubernetes namespace where the sidecar is deployed.
{
"username": "someuser",
"password": "somepassword",
"databaseName": "db1"
}
Note that databaseName is optional for singular credentials.
For multiple database accounts, store the local account credentials in the following JSON format:
[ {
"username": "someuser",
"password": "somepassword",
"databaseName": "db1"
},
{
"username": "someuser",
"password": "anotherpassword",
"databaseName": "db2"
}
]
Note that for multiple database accounts, databaseName is required so the sidecar can identify which database the credentials belong to.
Cyral recommends that you specify a unique environment variable for each local account in the repo.
tip
For MongoDB, your credentials secret must also include the name of the
authentication database. Add this by adding a databaseName entry in your
credentials secret payload. For example, if your authentication
database name is admin, then add the following entry to your
secrets payload: "databaseName": "admin".
Give your sidecar access to the local account
In this step, you will specify the local account(s) that SSO users will ultimately log in as when they connect to the repository.
In the Cyral control plane UI, go to Data Repos, click the name of your repository, click Local Accounts, and click the plus sign to track a new local account.
In the Track Account form, enter the Account username
In the Credentials section, choose the type of secrets manager and provide the secret location as shown below:
- AWS Secrets Manager
- Kubernetes Secrets
- GCP Secret Manager
- Environment variable
Choose AWS Secrets Manager and paste the ARN for the local account credentials. (Get the ARN from AWS Secrets Manager now if needed.) Inside the ARN, the secret must start with the /cyral/dbsecrets/ prefix. Here's an example:
arn:aws:secretsmanager:us-east-1:926775775309:secret:/cyral/dbsecrets/1m2xbhDKKCnEOU812c9KFCF0kfc-9mh6lxChoose Kubernetes Secrets and paste the identifiers of the local account credentials you saved earlier. These are the secret name (the name of the secret in Kubernetes Secrets) and the key name (its key name within the stringData blob in Kubernetes Secrets) .
For example, a credential secret deployed with the following YAML specification will have a name of my-local-acct-creds and a key name of my-repo1
apiVersion: v1
kind: Secret
metadata:
name: my-local-acct-creds
namespace: cyral-example-namespace
stringData:
my-repo1: |
{
"username": "someuser",
"password": "somepassword",
"databaseName": "db1"
}
...
Choose GCP Secret Manager and, in the **secret name** field, paste the unique identifier of the secret that holds the local account credentials you saved earlier. The identifier can take the form:
projects/<project name>/secrets/<secret-name>
or, if your secret has a version name in GCP Secret Manager:
projects/<project name>/secrets/<secret-name>/versions/<version-name>
If you omit the /versions/... portion of the identifier, then Cyral uses the latest version.
Choose Environment variable and specify the name of the variable that contains the database account credentials. Note the following:
- The variable must exist on the sidecar host; and
- The variable name must start with the prefix
CYRAL_DBSECRETS_
- Click Track.
Set the identity provider for the repository
In the Data Repos section of the Cyral control plane UI, click the name of your repository, and click Advanced.
Under Authentication ➡️ Identity Provider, choose the name of your SSO provider as set up in Connect Cyral to your SSO identity provider
Optional: If you prefer to give users the choice of accessing the same repo using either SSO or native credentials, then select Allow native authentication. If you choose to do that, then when connecting as an SSO user, the person must include their SSO username in their connection string, prefixed with "idp:". For example, the username portion of the connection string might be:
idp:nancy.drew@hhiu.us.Click Save.
Map an SSO user or group to a local account
When a data user authenticates, they can be mapped to a local account based on their username, or based on their membership in an SSO group in your identity provider. In Cyral, we call this mapping the identity map. Set up an identity map as follows:
In the Data Repos page, click the name of your repository, click the Identity to Account Map tab, and click the plus sign.
Choose User or Group as the Identity Type.
In the Identity field, depending on the selected Identity Type, specify the SSO username (email address) or the SSO group name as defined in your identity provider.
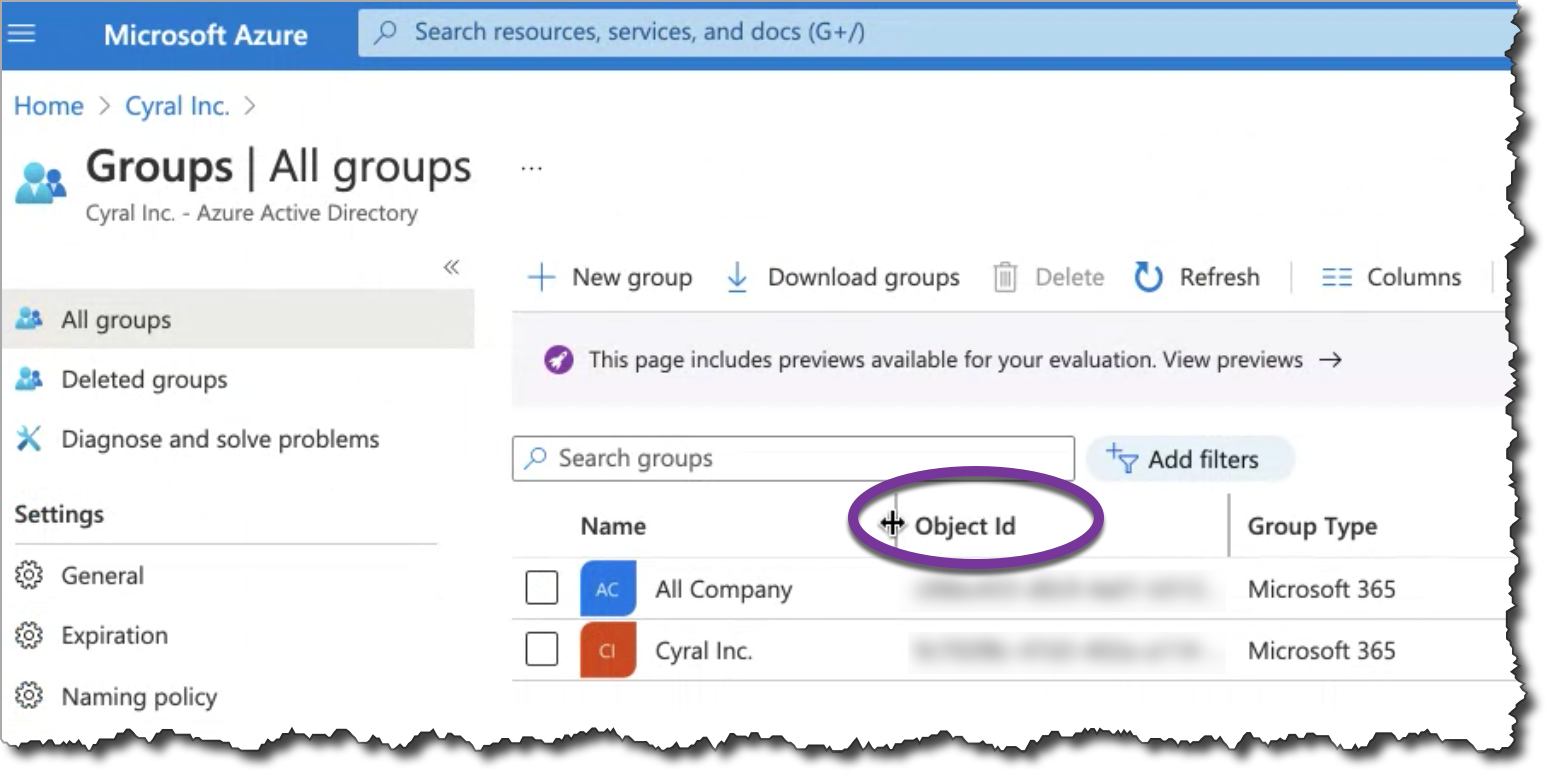
tip
Please note that for Azure AD, you'll specify the SSO group by its Object ID which you'll find in the Groups panel of your Azure management console.
In the Local Account field, choose the name of the local repository account, as configured in Cyral. See above.
In the Duration field, set a length of validity for the access, or click Unlimited to grant access that will not expire automatically.
Click Create.
At this point, users with a configured local account mapping can connect to your repository using their IdP credentials. They would start by navigating to the Cyral access portal as described here.
info
As an administrator, you can validate the configuration by creating a local account mapping for yourself, then navigating to your access portal by clicking the Access Tokens button at the top right of your management console.
Next step
- Check that the repository appears in the Cyral Access Portal for the users who need access.
- Follow the instructions in Connect to a data repository with SSO credentials to verify that users can connect based on your new configuration.
tip
Did you know that your users can quickly request and get access to a repository, just by chatting with the Cyral bot in Slack? See how to set it up now.