Manage repo-level policies
The Policies tab in the Data Repository Details page allows you to view and manage repo-level policies for a given data repository.
Repo-level policies can be created using either convenient policy wizards for common use cases or as custom local policies.
The following policy wizards are supported and they are explained in detail in the following sections:
- Data Firewall
- Data Masking
- Data Protection
- Object Protection
- Rate Limit
- Read Limit
- Repository Protection
- Schema Protection
- Service Account Abuse
- Stored Procedure Governance
- User Segmentation
Create a repo-level policy
To add or manage a repo-level policy in the Cyral control plane UI, follow the steps below:
info
Keep in mind the following restrictions:
- Each repo-level policy applies to a single repository (for example, a specific database).
- If multiple policies apply to a given database operation, then the effect of all policies are composed to provide least-privilege access. See Policy evaluation for details.
note
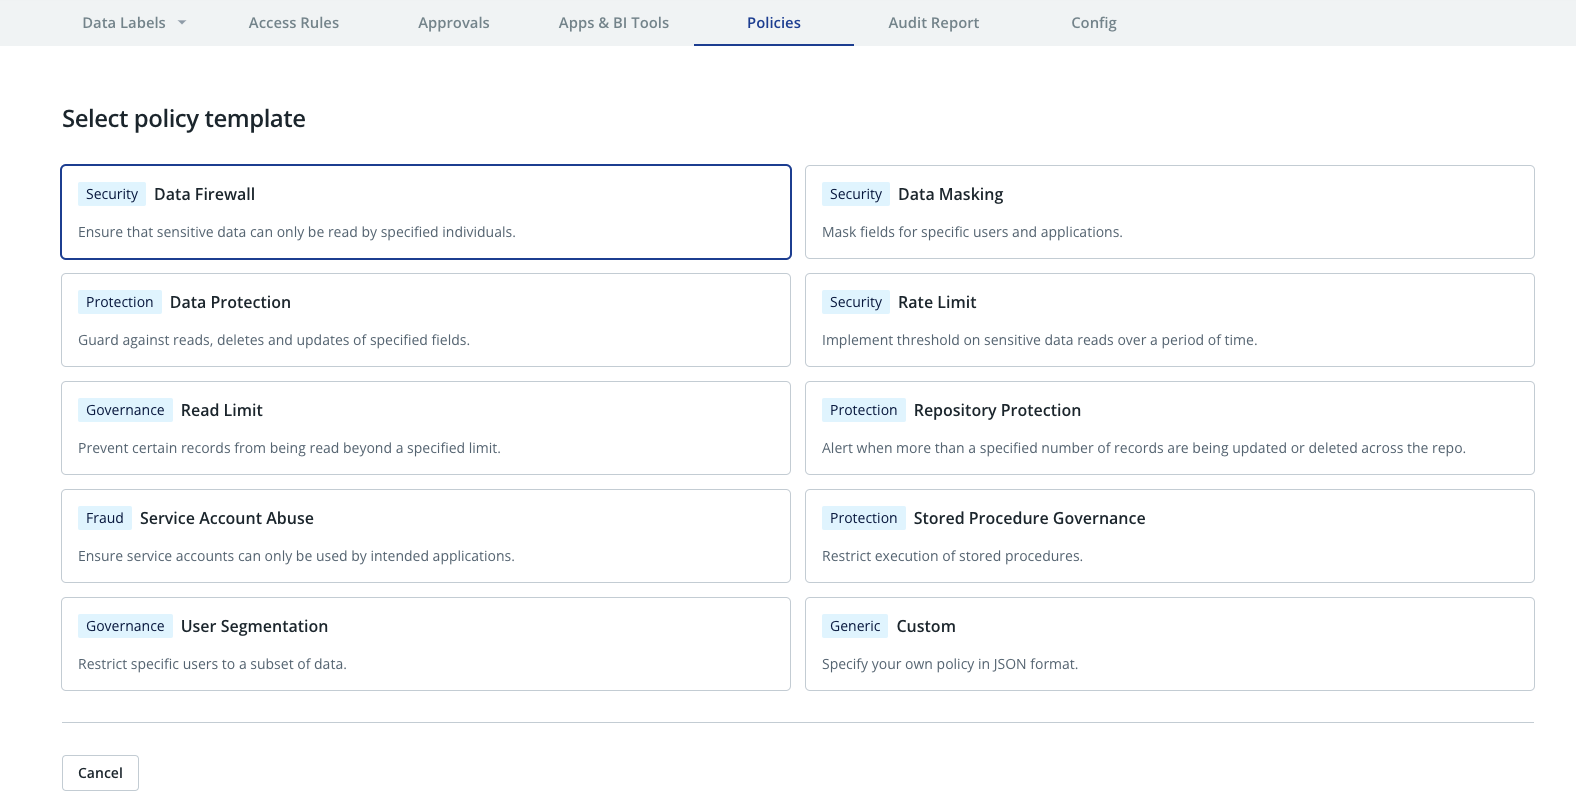
The policy wizards are a replacement for the policy templates in the versions of Cyral prior to 4.18. While policies previously created using these templates will continue to work, it is recommended to recreate these policies using the new policy wizards. Some of the earlier policy templates have been deprecated and the new Default Deny flag cannot be enabled if policies created using these templates exist for a repository.
Click Data Repos ➡️ your repository's name ➡️ Policies.
Click Add policy and select either a policy wizard from the list of supported policy types or choose to create a custom policy to start the policy wizard.
In the Describe panel:
- Give your policy a name and an optional description. This policy will be visible only within this repository's configuration.
- Optionally, you can add one or more Policy Type tags to the policy. To do this, type your tag name in the field below Policy Types and then click Add.
- Click Next.
If you chose to create a policy using one of the policy wizards, you will be guided through a sequence of screens where you specify the parameters for the policy. The types of policies and their required parameters are explained in the Policy Wizards section.
Finally, in the Who this policy applies to panel, choose the identities (SSO users, Emails or Groups) and/or database accounts this policy will cover. See Specify who this policy applies to for details. Click Next to proceed.
The UI will next display a summary of the newly configured policy. Click Add to add the policy.
If you chose to create a custom policy, the next screen will have a text area where you can enter (or paste) the policy document in JSON format. The policy format is described in the section on Local Policies. You can also choose to enable the policy in the test mode - this causes the policy violations to be reported but the policy is not actually enforced. Click Add Policy to save the policy.
Your policy is enabled by default, which means it takes effect immediately. To manage, disable, and enable your policy, use its card in the Policies panel.
Edit, enable, disable or delete a repo-level policy
To edit, enable, disable or delete a repo-level policy in the Cyral control plane UI, follow the steps below:
Click Data Repos ➡️ your repository's name ➡️ Policies.
Click on the desired policy.
Click Configure and choose Edit, Enable, Disable or Delete.
Policy Wizards
Cyral provides several policy wizards that can be used to create policies for common use cases. The following sections describe the supported policy wizards and how to use them to create or edit a policy.
Many of the policy wizards require specification of the data items that the policy applies to. These data items can be one or more of the following.
Data Locations Data locations refer to database tables or collections etc., and are specified as fully qualified names. For example:
db.tablefor MySQL and MariaDB,db.schema.tablefor PostgreSQL, SQLServer, Oracle, Snowflake etc.,db.collectionfor MongoDB.
Location names are case insensitive.
You can use wildcards to specify while specifying labels, tags, or locations. For example,
*.myschema.mytable would refer to the table mytable in schema myschema of
any database, while * can refer to any label, tag, or location.
Data Firewall
A data firewall policy limits which records or rows users can read from a specific location (for example, a table) in your data repository. A data firewall policy applies to all users other than those you explicitly allow (exempt) in the policy.
In the Specify when to apply this policy panel, specify the table or collection that this policy applies to, and click Next.
In the Specify how records will be restricted panel, you have two options:
Filter Condition: the condition you specify here will be used to generate a query that restricts records of the original location to those that satisfy the condition. This is achieved by replacing every occurrence of the location with a new query. For example, say the original query was
SELECT * FROM foo, and your condition iscol1 = value1 AND col2 > value2. Then, The resulting query will be equivalent toSELECT * FROM (SELECT * FROM foo WHERE col1 = value1 AND col2 > value2).note
The Filter Condition option is not available for MongoDB repos
Substitution Query: the query specified here will replace every occurrence of the data location (e.g, table) in the original query. For instance, your substitution could be a complex query, such as
SELECT o.* FROM orders o JOIN customers c ON o.customer_id = c.id WHERE c.is_test_customer = true. In this case, if the original query wasSELECT * FROM customers, it would be transformed to a query equivalent toSELECT * FROM (SELECT o.* FROM orders o JOIN customers c ON o.customer_id = c.id WHERE c.is_test_customer = true).note
For MongoDB repositories, your input should be a series of stages from an aggregation pipeline. These stages will be added to the original query. For example, your input could be
[{"$match": {"field": "value"}}]. Note that the double quotes are mandatory for all keys and string values, even if they are not mandatory in some MongoDB tools such asmongosh.You can use the placeholder
${dataset}in your substitution query to refer to the dataset name.
In the Specify who can see restricted records panel, specify the users, emails and/or groups who will be allowed to read the data. All the listed entries will be allowed to read the data unless blocked by another policy. Use the Add button to add identities (SSO users, Emails or Groups) allowed to read the data.
Data Masking
Mask repository fields for specific users and applications.
- In the Specify masking parameters panel:
- Choose the Masking Type. It can be one of: Null Mask, Constant Mask or Format-Preserving Mask. See mask types for more information.
- Specify the data labels and/or data tags that this policy applies to.
- In the Who this policy applies to panel, choose identities (SSO users, Emails or Groups) and/or database accounts this policy will cover. See Specify who this policy applies to for details.
Data Protection
Guard against unauthorized access to specified fields in your database. You can choose whether this policy blocks the action or only sends an alert when the action occurs. This policy type has the following parameters:
- In the Database Operations section, choose the types of actions this policy will apply to (reads, updates, deletes, and/or inserts).
- In the Targeted Data section, specify the data labels, data tags and/or data locations that this policy applies to.
- In Policy Actions, specify:
- Alert to send an alert and allow the operation to proceed.
- Alert and Block to send an alert and block the operation.
- In the Who this policy applies to panel, choose the identities (SSO users, Emails or Groups) and/or database accounts this policy will cover. See Specify who this policy applies to for details.
See also blocking access in policy framework.
Object Protection
Guard against unauthorized creation, deletion, and modifications of objects of a specific type (currently Roles/Users) in your database. You can choose whether this policy blocks the action or only sends an alert when the action occurs. This policy type has the parameters:
- The Object Type section, shows the type of objects that this policy will protect. Currently, the supported object type is Roles/Users.
- In the Select Operations section, select one or more from
Create,Alter, andDropoperations. - In Policy Actions, specify:
- Alert to send an alert and allow the operation to proceed.
- Alert and Block to send an alert and block the operation.
- In the Who this policy applies to panel, choose the identities (SSO users, Emails or Groups) and/or database accounts this policy will cover. See Specify who this policy applies to for details.
See also blocking access in policy framework.
Rate Limit
Implement threshold on sensitive data reads over a period of time per user. You can choose whether this policy blocks the action or only sends an alert when the action occurs.
- Specify the Maximum number of rows that can be returned per hour.
- In the Targeted Data section, specify the data labels and/or data tags that this policy applies to.
- In Policy Actions, specify:
- Alert to send an alert and allow the operation to proceed.
- Enforce to block the operation when the rate limit is achieved.
- In the Who this policy applies to panel, choose the identities (SSO users, Emails or Groups) and/or database accounts this policy will cover. See Specify who this policy applies to for details. Cyral tracks the rate limit quota per user, meaning that if the identity is a group, each user in this group will have his/her own quota.
See also blocking access in policy framework.
Read Limit
Prevent certain records from being read beyond a specified limit. You can choose whether this policy blocks the action or only sends an alert when the action occurs. This policy type has the parameters:
- Type the Maximum number of rows that can be modified per query, and click Next.
- In Targeted Data, specify the data labels, data tags, and/or data locations that this policy applies to.
- In Policy Actions, specify:
- Alert to send an alert and allow the operation to proceed.
- Alert and Block to send an alert and block the operation.
- In the Who this policy applies to panel, choose the identities (SSO users, Emails or Groups) and/or database accounts this policy will cover. See Specify who this policy applies to for details.
See also blocking access in policy framework.
Repository Protection
Alert when more than a specified number of records are being updated, deleted, or inserted across the repo. This policy type has the following parameters:
- In the Database Operations section, choose the types of actions this policy will apply to (inserts, updates, and/or deletes).
- Type the Maximum number of rows that can be modified per query.
- In the Targeted Tables section, specify the data locations that this policy applies to.
- In the Who this policy applies to panel, choose the identities (SSO users, Emails or Groups) and/or database accounts this policy will cover.
Schema Protection
Prevent schema changes (creating, altering, dropping of tables and views) in a repository, except by specific identities. You need to specify the following parameters:
- Specify the names of the schemas to protect.
The schema names must be fully qualified, that is, in the form
<database>.<schema>(except for MySQL and MariaDB, where schemas are top level objects). - In Policy Actions, specify:
- Alert to send an alert and allow the operation to proceed.
- Alert and Block to send an alert and block the operation.
- In the Exempt Users section, choose the identities (SSO users, Emails or Groups) that are allowed to perform schema changes.
Service Account Abuse
Alert when database accounts are used in passthrough authentication, that is, when a client authenticates directly to the database using the database account credentials.
- In the Specify which accounts to alert for panel, specify database accounts for which end user attribution is always required, meaning that an alert will be created when the given accounts are used to read, update or delete data without end user attribution.
Stored Procedure Governance
A stored procedure governance policy applies to sets of users and database accounts, and controls execution of stored procedures.
- In the Specify policy parameters panel, add the names of all the stored procedures for which you want to have execution control (wildcards can be used). You can also choose whether to alert on or block the execution.
User Segmentation
A user segmentation policy applies to a set of users you specify, and it limits which rows or records those users can read from a table or collection in your database.
In the Specify who is limited to a subset of records panel, choose the set of users whose query results will be limited by this policy. You can either apply this policy to identities (SSO users, emails, and groups) or to database accounts.
In the Specify when to apply this policy panel, you'll list the data locations this policy covers.
- In the Data Set field, specify the dataset or data location that this policy applies to. This name is case insensitive.
In the Specify how records will be restricted panel, you have two options:
Filter Condition: the condition you specify here will be used to generate a query that restricts records of the original location to those that satisfy the condition. This is achieved by replacing every occurrence of the location with a new query. For example, say the original query was
SELECT * FROM foo, and your condition iscol1 = value1 AND col2 > value2. Then, The resulting query will be equivalent toSELECT * FROM (SELECT * FROM foo WHERE col1 = value1 AND col2 > value2).note
The Filter Condition option is not available for MongoDB repos
Substitution Query: the query specified here will replace every occurrence of the data location (e.g, table) in the original query. For instance, your substitution could be a complex query, such as
SELECT o.* FROM orders o JOIN customers c ON o.customer_id = c.id WHERE c.is_test_customer = true. In this case, if the original query wasSELECT * FROM customers, it would be transformed to a query equivalent toSELECT * FROM (SELECT o.* FROM orders o JOIN customers c ON o.customer_id = c.id WHERE c.is_test_customer = true).note
For MongoDB repositories, your input should be a series of stages from an aggregation pipeline. These stages will be added to the original query. For example, your input could be
[{"$match": {"field": "value"}}]. Note that the double quotes are mandatory for all keys and string values, even if they are not mandatory in some MongoDB tools such asmongosh.You can use the placeholder
${dataset}in your substitution query to refer to the dataset name.