How to track Redshift with Native IdP federation
You can leverage Cyral to secure your Amazon Redshift clusters with native identity provider (IdP) federation with either Azure Active Directory (Azure AD / Microsoft Entra ID) or AWS Identity Center. Once you've associated a Cyral sidecar with your Redshift cluster, you can write policies to restrict data access, which will be enforced on data users connecting to Redshift through the Cyral sidecar.
Example Diagrams
The diagram below illustrates the most common scenario in which users connect to Amazon Redshift via the Cyral sidecar while using their Azure AD / Microsoft Entra ID credentials. It's important to note that although the sidecar is depicted within the AWS Cloud, it is not strictly necessary for it to be deployed there. All the functionalities described on this page would also function properly if the sidecar was deployed on-premises or with any other infrastructure provider. The only essential requirement is that the sidecar machine must have network access to the Redshift cluster, and end-users must also be able to reach the sidecar machine.
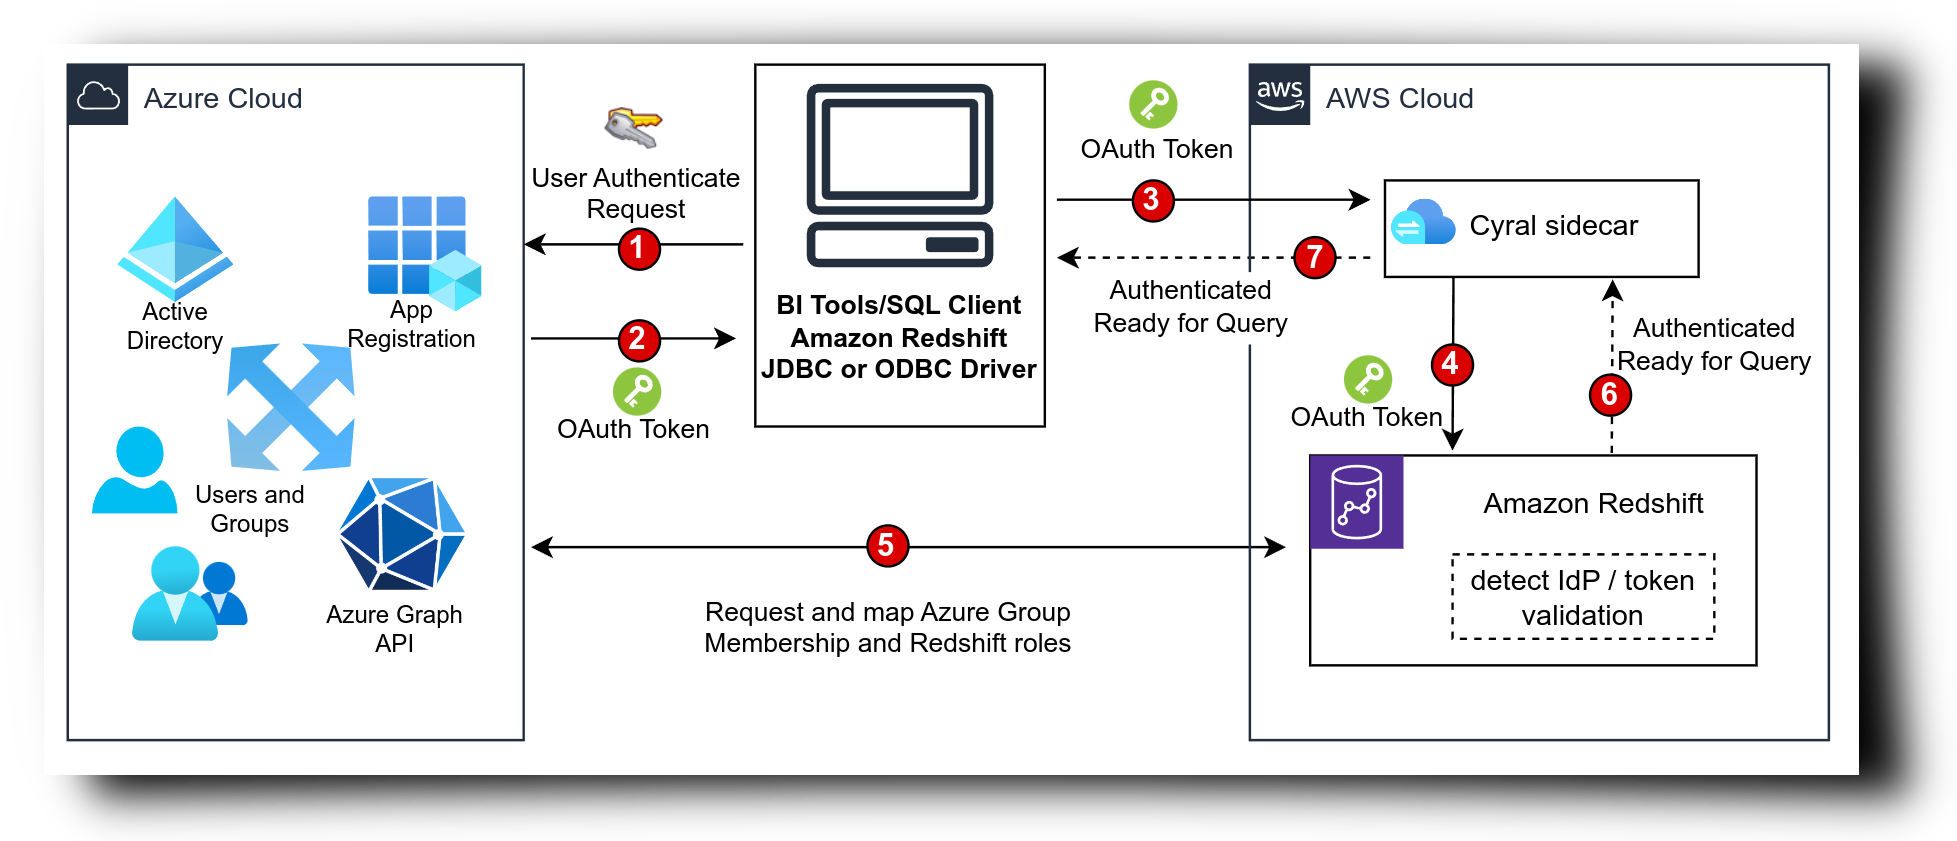
The sidecar will extract and parse the OAuth token, extracting all relevant user information provided by Azure AD. The sidecar does not validate this token, deferring this task to the Redshift cluster itself.
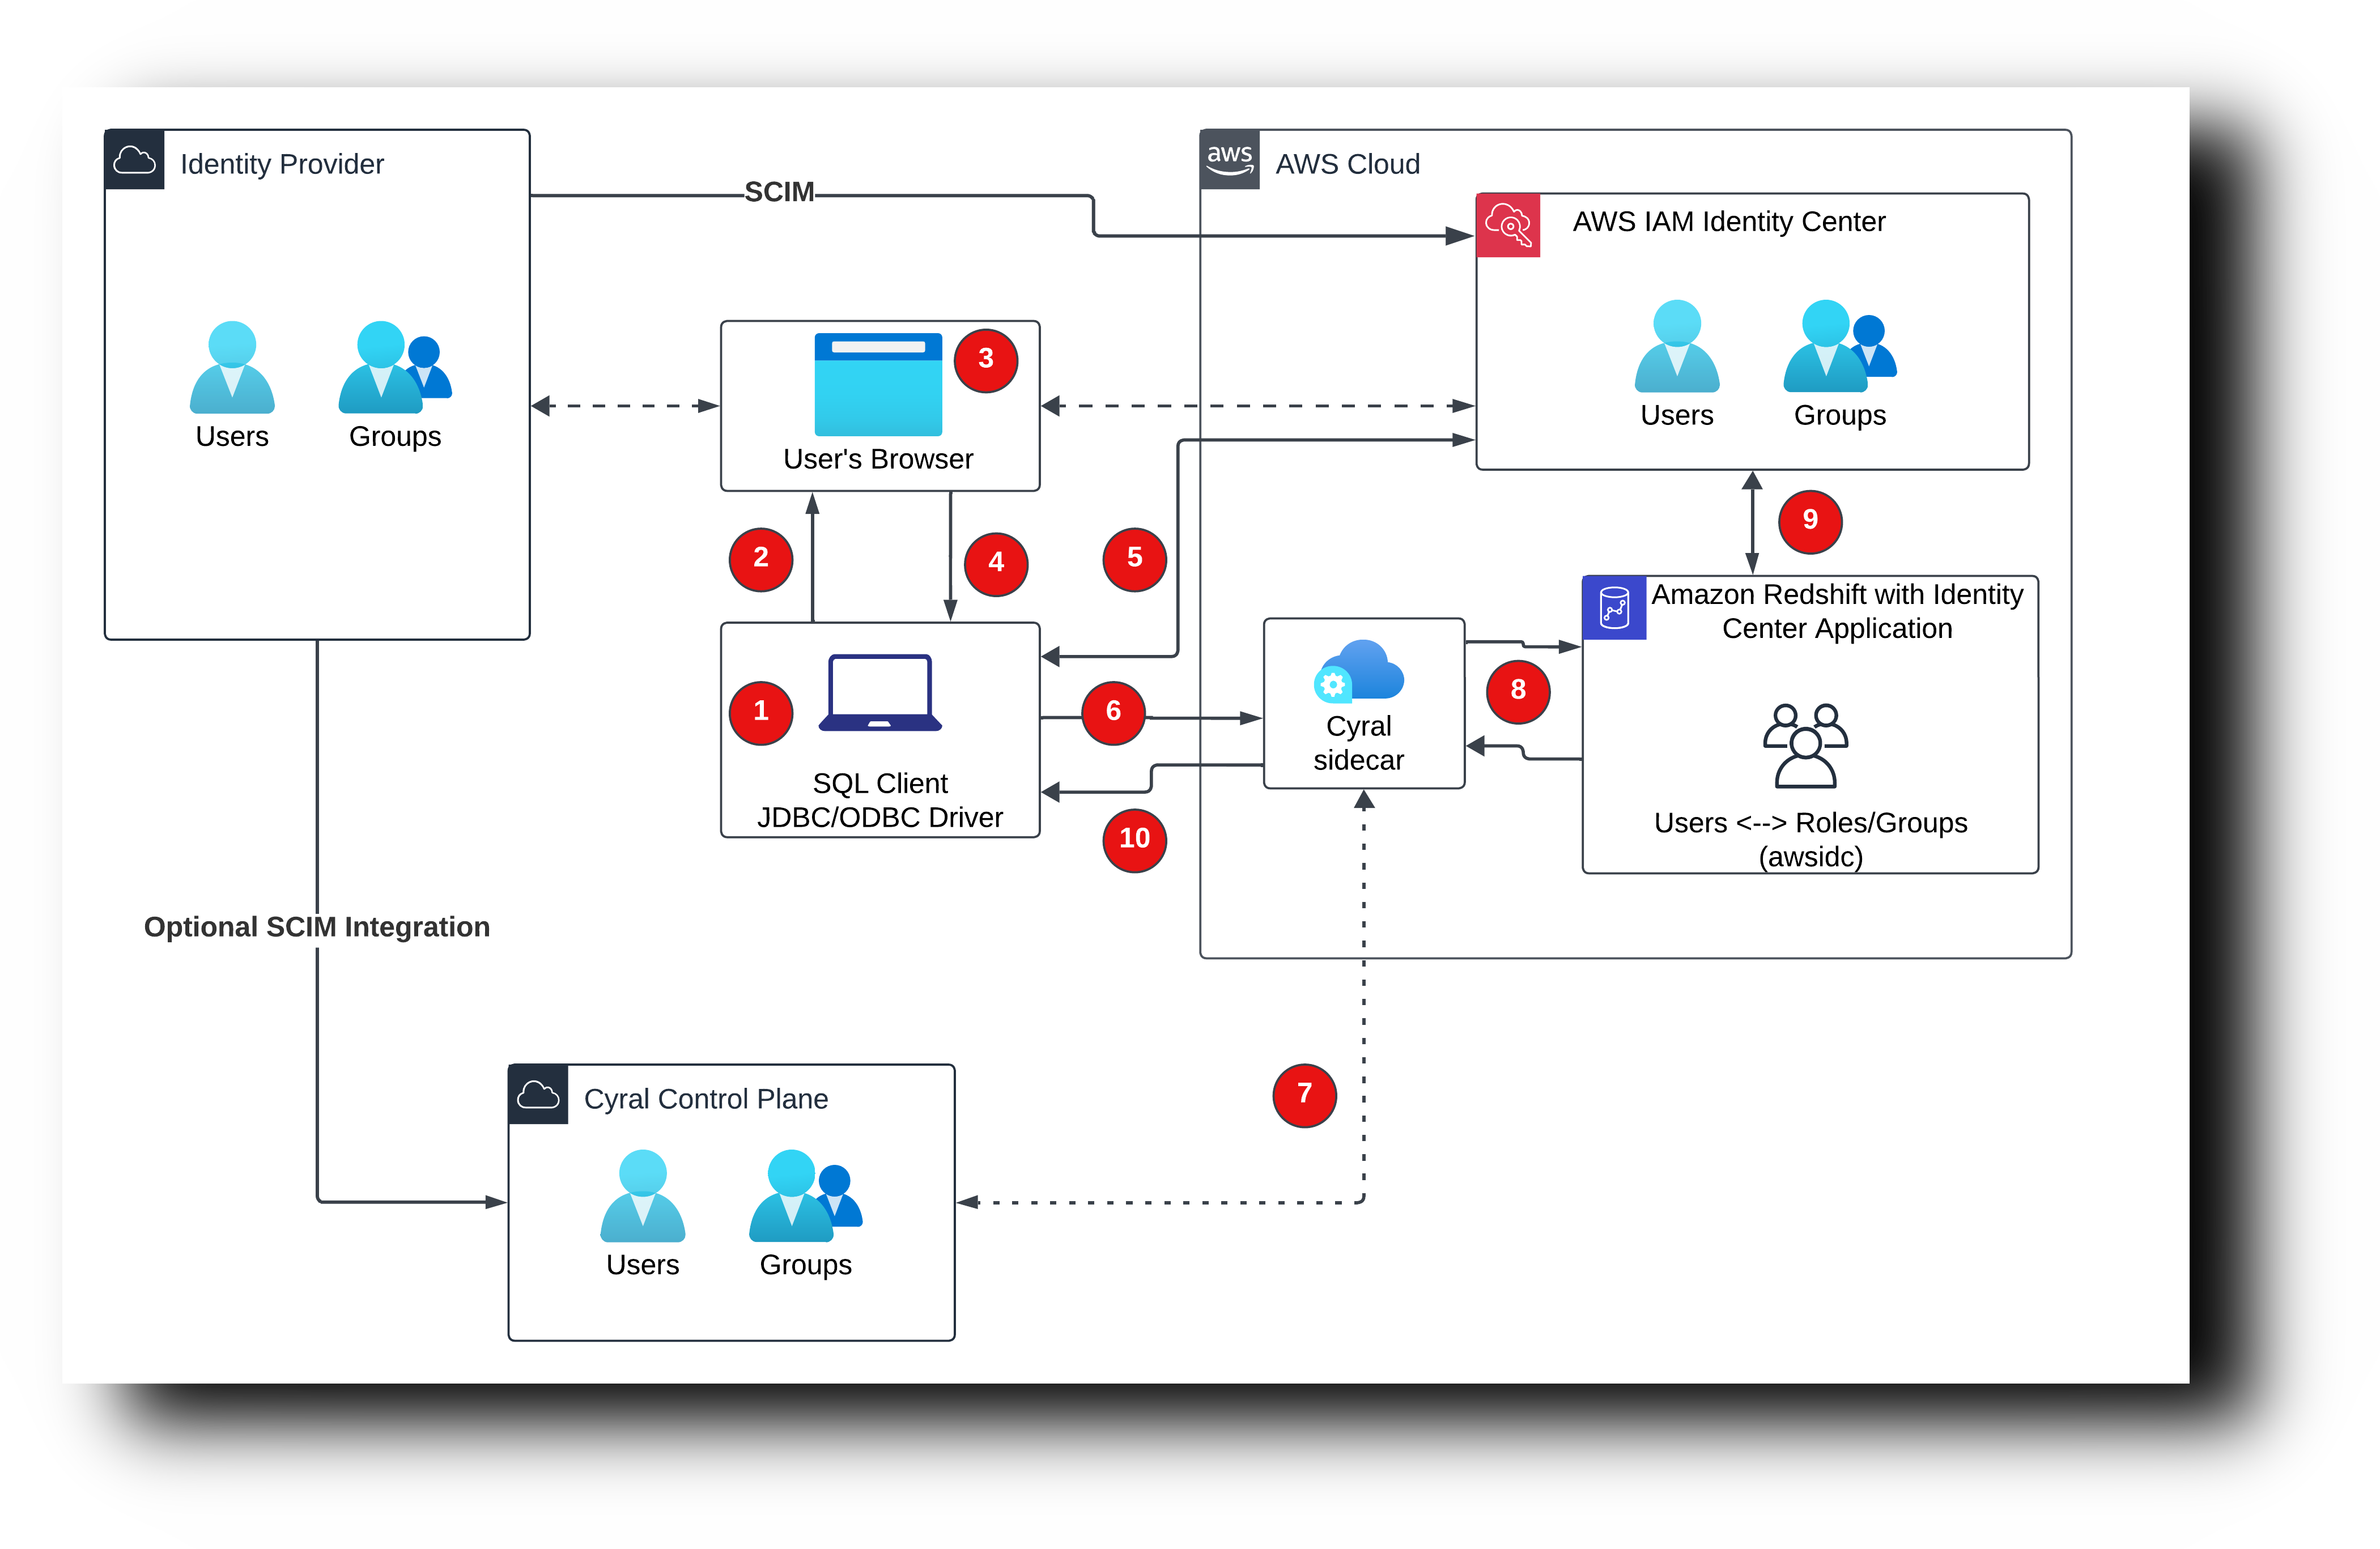
In the integration with AWS Identity Center, the sidecar does not handle user authentication, delegating that responsibility to the Redshift cluster. Unlike the direct integration with Microsoft Entra ID, when utilizing AWS Identity Center, the sidecar can retrieve the list of groups mapped to the end user only through a SCIM integration with the Control Plane.
note
The traffic from the Amazon Query Editor V2 web application cannot be routed through the Cyral Sidecar. Only traffic from local SQL clients, such as DBeaver and DbVisualizer, can be proxied through the Sidecar.
Prerequisites
Cyral sidecar: If you don't already have a v4.17.2 or later Cyral sidecar deployed for your Redshift cluster, deploy it now.
Redshift Integration with Azure AD / Microsoft Entra ID : It is expected that you already integrated your Redshift cluster with Azure AD. If you haven't yet, please do it. The following AWS blog post explains, step-by-step, how to integrate Azure AD with your Redshift cluster:
- Redshift Integration with AWS Identity Center: In this integration, AWS Identity Center is typically configured with a backend Identity Provider (IdP), such as Okta, Ping, OneLogin, or Microsoft Entra ID. Users are synchronized between the IdP and AWS Identity Center. When configuring the SCIM integration with the Cyral Control Plane, it is required that the integration be established directly between the backend IdP and the Control Plane.
Note that only one of the two Redshift integrations above are required.
Procedure
To track a Redshift cluster in Cyral, open the Cyral management console, navigate to the Data Repos tab and click the Add Repository button.
In the Add repository window:
- Repository type: Select Amazon Redshift.
- Name: The name by which your data users will find this Redshift instance.
- Hostname and Port: The address and port of the Redshift cluster. This is the address at which Cyral connects to the repository, and we refer to it as the data repository endpoint. Later, when you assign this repository to its sidecar, you will establish a separate user-facing address, the sidecar load balancer address. Data users connect to the repository through the sidecar load balancer address.
Click on the Add button.
Associate the Redshift data repository your Cyral sidecar:
- In the Cyral management console, navigate to the Sidecars tab and click the name of the sidecar to which you'd like to assign the repository.
- Go to Bindings tab and click on the Bind Data Repo button.
- In the Bind Data Repo window, choose the name of the Redshift data repository created above.
- Specify the Sidecar port. Data users will connect tools like DBeaver or SQL Workbench/J to this repository at the sidecar hostname and this port.
- Click Bind.
(Optional) Propagating list of Groups from Microsoft Entra ID / Azure AD to Cyral
note
This step is not applicable to the integration with AWS Identity Center. This is also an optional configuration and can be replaced with a SCIM integration between the IdP and the Cyral Control Plane.
Your Redshift data repository is now accessible through the Cyral sidecar, and users should be able to connect using their Azure AD credentials, assuming the integration between Redshift and Azure AD was already done.
Once an end-user connects to Redshift through Cyral, using their Azure AD credentials, Cyral will correctly attribute the user identity in the data activity logs and this identity information may be used in Cyral policies which governs the data access in the Redshift cluster. However, with the standard configuration documented by AWS, Cyral doesn't receive the list of groups end-users are members of.
To propagate group membership information from Azure AD to Cyral, please follow these steps:
Go to Azure AD portal and log in with the account used to integrate Azure with Redshift.
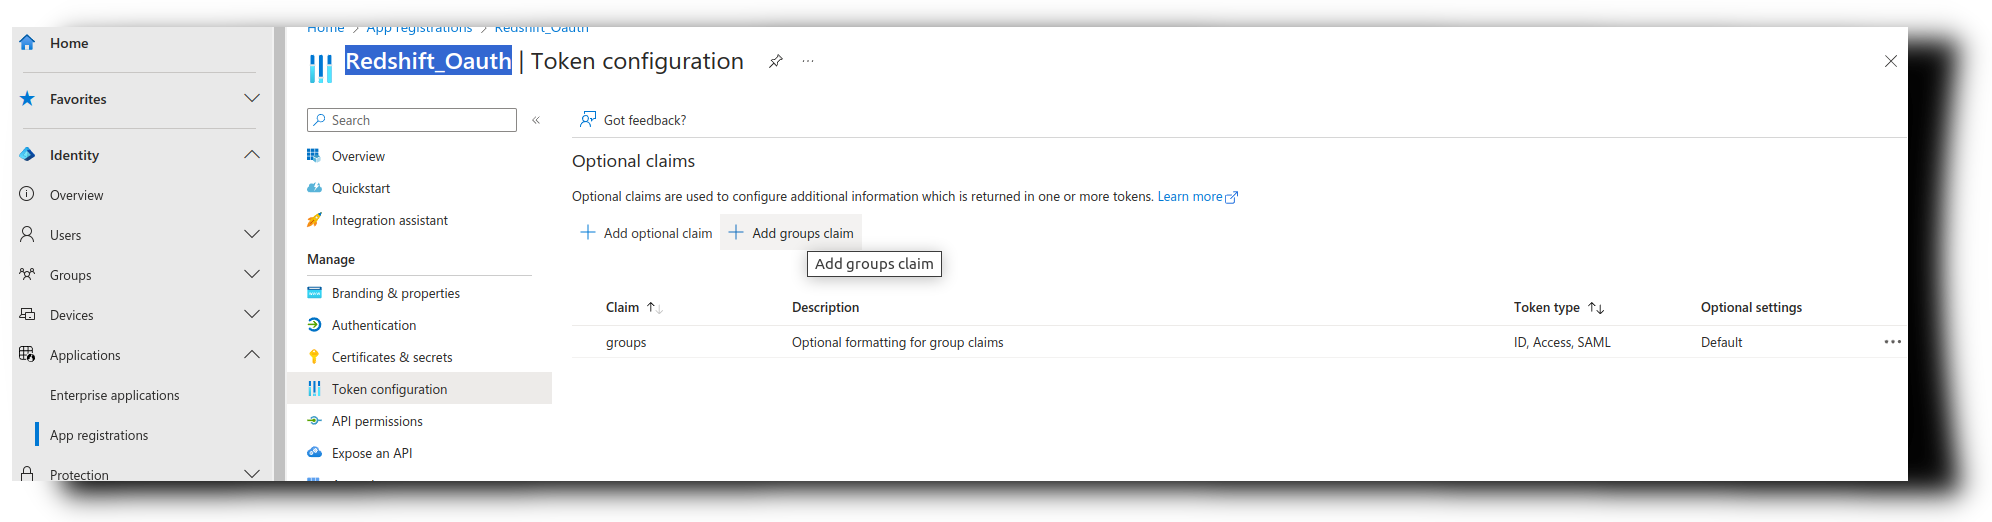
Go to the list of Applications, and select the one used for configured for handling the OAuth authentication with the end-users. In the AWS documentation referenced in the beginning of this page, this application is referred to as oauth_application.
Click on Token configuration and Add groups claim.
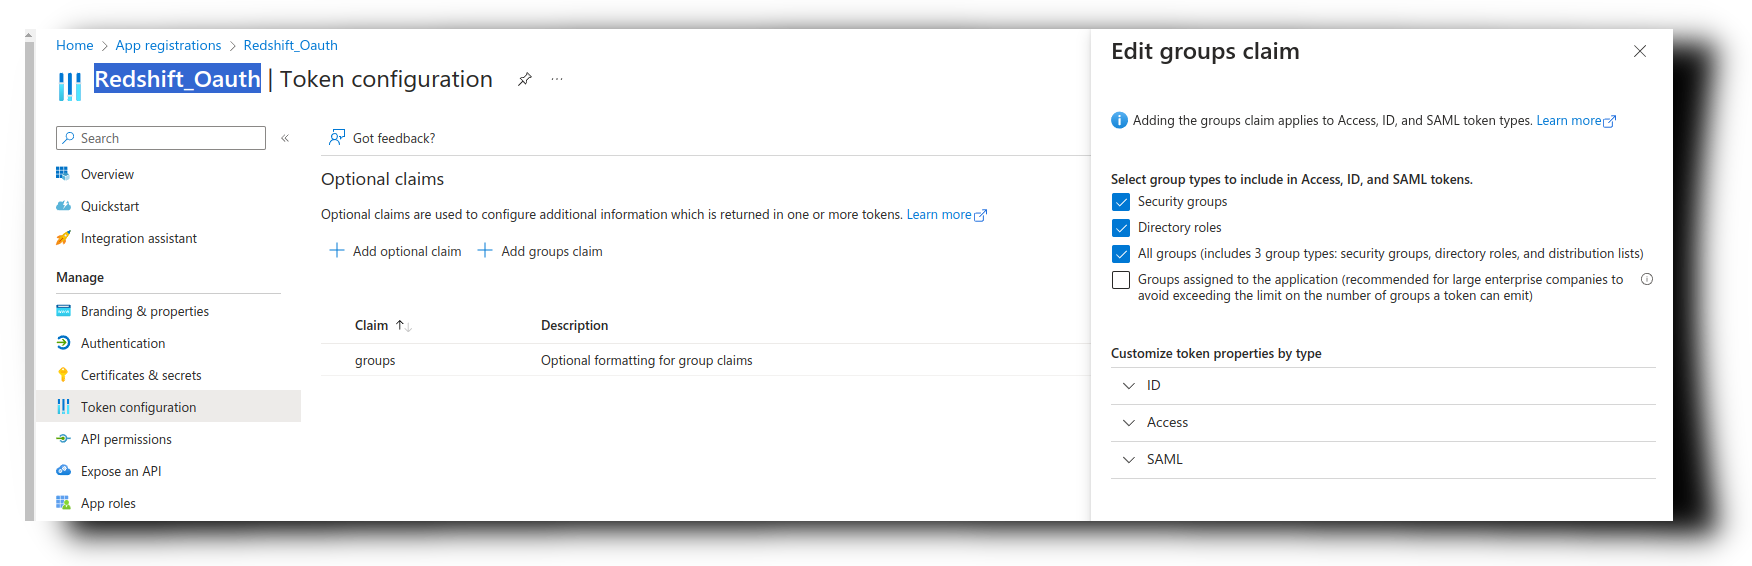
- Check the box for All groups, and click on Save.
After following the steps above, groups will be propagated alongside the user identity from Azure AD to Cyral. This information will be present in data activity logs and may be used in Cyral Policies:
"identity": {
  "endUser": "frank.hardy@hhiu.onmicrosoft.com",
  "group": "ff55d0fc-dd73-11ee-bd75-9fc8cdf2bfa6",
  "userGroups": [
    "ff55d0fc-dd73-11ee-bd75-9fc8cdf2bfa6",
    "953c817d-c5dd-40e1-bbf9-2ff159169551",
    "dd3a6dc5-f59c-449e-96cb-ff6ecb16fc5a",
    "ffe0b866-dd73-11ee-b5d3-6b1f5949d07e"
  ],
  "repoUser": "frank.hardy@hhiu.onmicrosoft.com"
}
note
Unlike other Identity Providers, Azure AD operates by sending group IDs instead of group names. Therefore, Cyral policies intended for user groups should also utilize group IDs rather than names.