SSO with a SAML 2.0 identity provider
With Cyral, you can authenticate database users against your SAML 2.0 identity provider (IdP). Optionally, Cyral can read each user's group memberships from the SAML provider to set the user's data privileges and/or Cyral administrative role.
Procedure
Create a new SAML integration: Log in to your Cyral control plane UI, navigate to the Integrations section, find the SAML integration tile, and click Configure.
Create a new SAML connection:
Specify a Display Name. This display name is used to identify the IdP to the user when they log in.
In Attribute Names in SAML Assertion section, specify IdP field name for each required attribute (first and last name, email, SSO groups). This specifies the user data the IdP will provide in the SAML assertion:
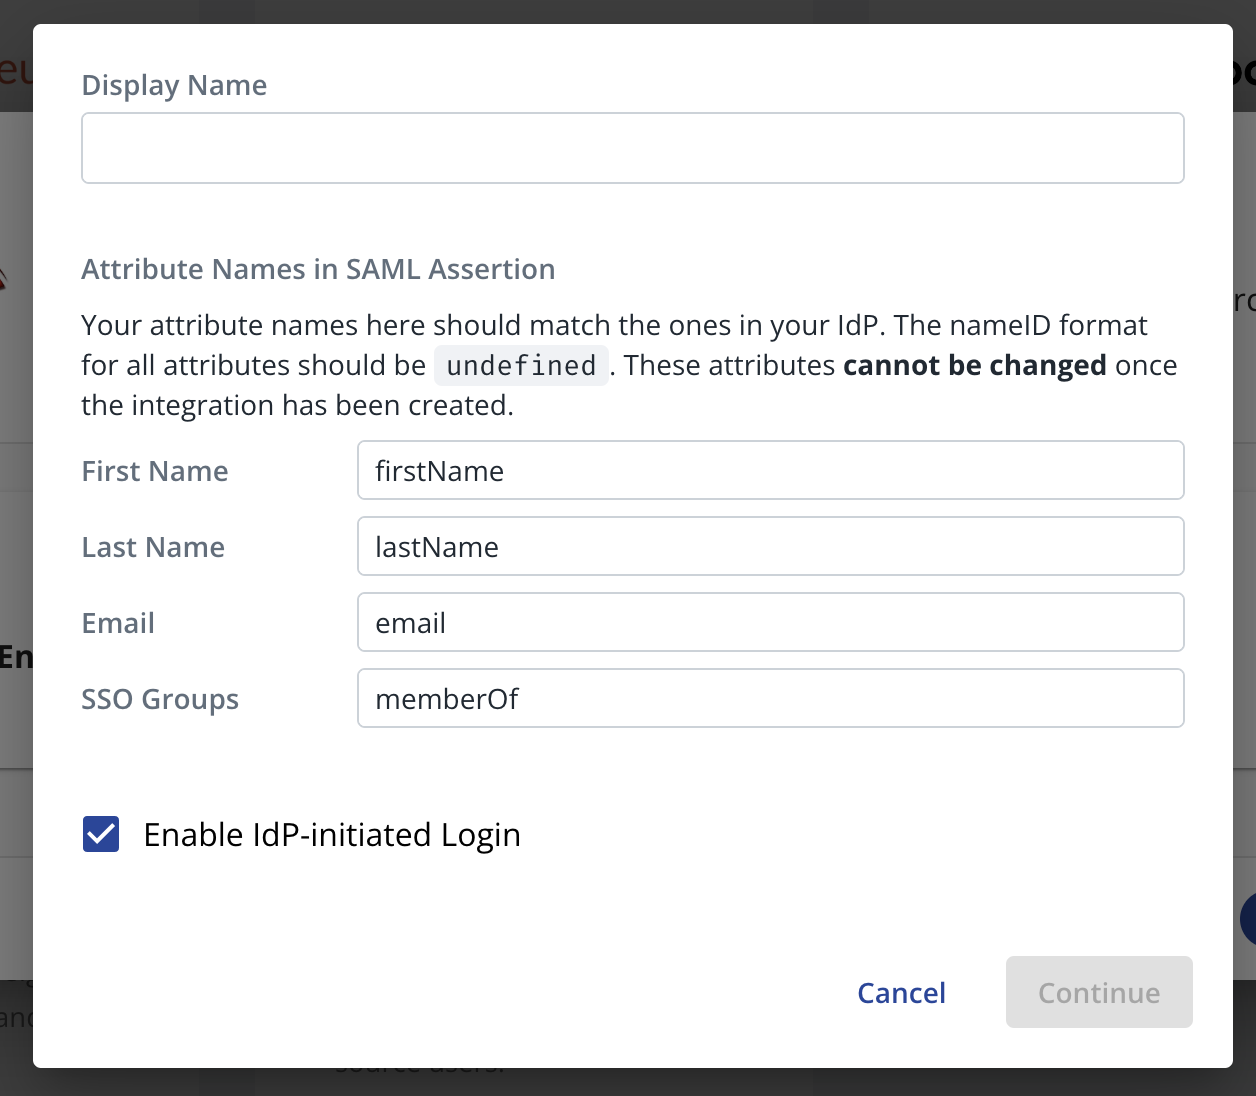
caution
These attributes cannot be modified once the integration has been saved in Cyral. When you configure your IdP, be sure to use the attributes you've specified here.
Enable IdP-initiated login checkbox: When you add any IdP integration in Cyral, your users can log in using the Cyral Access Portal. If selected, this checkbox gives your users a second way to log in: from your IdP portal.
Set IdP-initiated login to
ONto give users the added option of logging in from your IdP-based portal (for example, an Okta portal).tip
Enabling IdP-initiated login requires a second ACS URL in your SAML app. For details, see SP-initiated and IdP-initiated login, below.
Set IdP-initiated login to
OFFto disable IdP-initiated login. Do this if login is not supported by your IdP, or if you don't want to let users log in from your IdP portal.
Click Continue
On the next screen, download the SP metadata file. You'll need this in the next step to set up your IdP.
Set up your IdP:
- Create a new app integration in your IdP platform.
info
Keep in mind these requirements when you create the application in your IdP:
- The IdP application must use the SAML 2.0 sign-on method and support the SAML 2.0 POST binding.
- The IdP application must sign authentication requests and SAML assertions.
- The IdP application must use SAML 2.0 NameID
format,
urn:oasis:names:tc:SAML:1.1:nameidformat:unspecified - The IdP application must support sending each user's email, first name, last name, and group membership in the SAML assertion.
- If you set up this integration to support both SP-initiated and IdP-initiated login, then your SAML application must have two ACS URLS. See SP-initiated and IdP-initiated login, below.
- In the new app, upload the SP metadata file you got from the
Cyral control plane.
tip
All of the required configuration information is contained in the SP metadata file. If your IdP does not support SP metadata import, consider extracting the needed SAML configuration values from the metadata manually, or contact the Cyral support team for assistance in setting up your IdP.
- Once the app integration has been created, download the IdP app's metadata file or get its SAML metadata URL.
- Create a new app integration in your IdP platform.
In the Cyral control plane UI, return to the SAML setup screen (click on Integrations ➡️ SAML if needed). Load the app's metadata file. There are two ways to do this:
- in the IdP metadata URL field, provide the address where the file is available; or
- click upload a metadata document and upload the app's metadata file.
Click Save. This completes the setup.
Test the setup by logging in as an SSO user.
Log out of the Cyral control plane UI, or open a separate browser where you can perform a fresh login.
Once you have logged out, a new login option will be available on the login screen of the Cyral control plane UI.
Click the button of the newly configured IdP. This prompts you to authenticate using the credentials stored in that IdP.
Test IdP-initiated login, if you have enabled it:
- Make sure you're logged out of the Cyral control plane UI.
- Log in to the IdP and select the Cyral application you created.
- If you can access the Cyral control plane UI, your setup was successful.
Next step
See Set up SSO authentication for users for the steps to activate SSO authentication on each repository that will use it.
SP-initiated and IdP-initiated login
When you connect Cyral to your IdP provider for SSO, this always enables service provider-initiated login (SP-initiated login), which means users can log in using the Cyral Access Portal. Using SAML terminology, Cyral is the "service provider" in the login.
Optionally, you can set up your IdP integration in Cyral to also allow IdP-initiated login, if your IdP supports it. In IdP-initiated login, the user visits your IdP-based portal (for example, an Okta portal) to log in.
Adding Assertion Consumer Service URLs to support IdP-initiated login
If you set up your IdP integration to support both SP-initiated and IdP-initiated login, the SAML application (defined in your IdP) requires two Assertion Consumer Service URLs (ACS URLs; also called "Requestable SSO URLs" in Okta). This allows Cyral to act as a SAML service provider for the two ACS URLs:
- one for IdP-initiated login
- one for SP-initiated login
Example: Okta settings for IdP-initiated login
To support IdP-initiated login with Okta, add two ACS URLs to your SAML app as shown here:
- In your Okta management console, edit your Okta SAML app and select the option Allow this app to request other SSO URLs. This enables you to add multiple Requestable SSO URLs (ACS URLs).
- In the first Requestable SSO URL field, add the ACS URL for IdP-initiated login.
Set its Index to 0. This URL is available in the SP metadata file from Cyral
and has the format:
https://$CYRAL_CONTROL_PLANE_DOMAIN/auth/realms/default/broker/$IDP_INTEGRATION_ALIAS/endpoint/clients/$IDP_INTEGRATION_ALIAS-client - Click Add Another to show a second Requestable SSO URL field.
Add the ACS URL for SP-initiated login here. Set its Index to 1.
This URL is available in the SP metadata file from Cyral and has the format:
https://$CYRAL_CONTROL_PLANE_DOMAIN/auth/realms/default/broker/$IDP_INTEGRATION_ALIAS/endpoint